the v-User Editor Program Manual
Table of content
Introducing the Toolbar
As you can see in the following image, the main tools of the Editor application are available in the toolbar. You can use these buttons to add or edit the actions.

We discuss each of these functions in the following articles.
New Button in the Editor Toolbar
The
 button.
Shortcut: Ctrl + N.
Working Area: whole application.
By clicking on this button, you can begin working on a new macro.
The Open Button in the Editor
The
![]() button.
button.
Shortcut: Ctrl + O.
Working Area: whole application.
By clicking on this button, you can begin working on a saved macro. If you click on the arrow on the right, a menu will appear, and you can choose from a list of the recent macros.
The Save Button in the Editor
The
![]() button.
button.
Shortcut: Ctrl + S.
Working Area: whole application.
By clicking on this button, you can save the changes you’ve made. If you want to save the macro with a different name or in a different location, you can click on the arrow on the right and select “Save As..”
Edit Button in the Editor Application
The
![]() button.
button.
Shortcut: Ctrl + S.
Working Area: The selected action.
By clicking on this button, the parameter window of the action will be opened, and you can edit them. Each action has a different set of parameters, and we’ve talked about them int the “Actions of the Editor” section.
Up Button in the Editor
The
![]() button.
button.
Shortcut: Ctrl + Arrow Up
Working Area: The selected action.
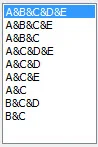
The actions of a macro execute in order from the first line to the last. If you want to change the order of actions, you can use this button to move it up. Clicking on the arrow in the right opens this menu:
By selecting ![]() , a window will open, and you can specify the number of the line you want,
and the macro will move there. If you select
, a window will open, and you can specify the number of the line you want,
and the macro will move there. If you select ![]() , the selected action will move to the
first line of the macro.
, the selected action will move to the
first line of the macro.
Down Button in the Editor
The
![]() button.
button.
Shortcut: Ctrl + Arrow Down
Working Area: The selected action.
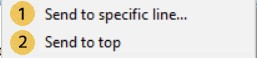
The actions of a macro execute in order from the first line to the last. If you want to change the order of actions, you can use this button to move it up. Clicking on the arrow in the right opens this menu:
By selecting ![]() , a window will open, and you can specify the number of the line you want,
and the macro will move there. If you select
, a window will open, and you can specify the number of the line you want,
and the macro will move there. If you select ![]() , the selected action will move to the
last line of the macro.
, the selected action will move to the
last line of the macro.
The Duplicate Button in the Editor
The
![]() button.
button.
Shortcut: None
Working Area: The selected action.
By clicking on this option, the selected action will be copied and pasted below that line.
The Delete Button in the Editor
The
![]() button.
button.
Shortcut: Delete
Working Area: The selected action.
By clicking on this option, the selected action will be deleted immediately.
The Undo Button in the Editor
The
![]() button.
button.
Shortcut: Ctrl + Z
Working Area: For the changes made to the existing actions.
By clicking on this button, you can undo the last change you’ve made.
The Redo Button in the Editor
The
![]() button.
button.
Shortcut: Ctrl + Y
Working Area: For the changes made to the existing actions.
By clicking on this button, you can redo your previous action.
The Macro Settings Button in the Editor Application
By clicking on this button, the following window will open:
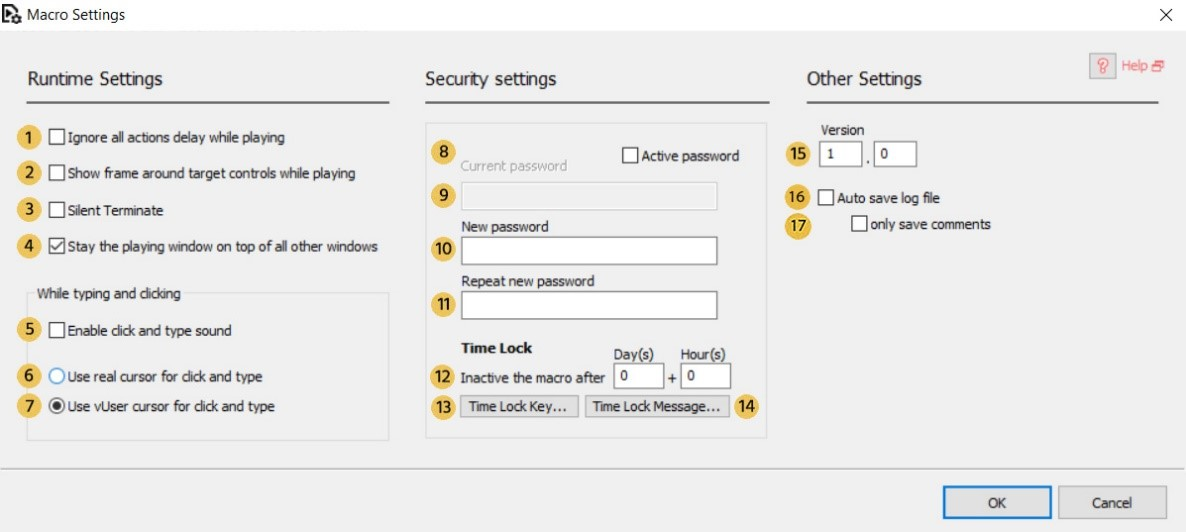
![]() Ignore all actions delay while playing
:
If this option is enabled, each of the actions will be executed without any delay.
Ignore all actions delay while playing
:
If this option is enabled, each of the actions will be executed without any delay.
![]() Show frame around target controls while playing
:
If this option is selected, while the Macro is running, a green frame will be shown around the active windows.
Show frame around target controls while playing
:
If this option is selected, while the Macro is running, a green frame will be shown around the active windows.
![]() Silent Terminate
:
If this option is selected, when the Macro reaches the end of its actions, no message box will be shown.
Silent Terminate
:
If this option is selected, when the Macro reaches the end of its actions, no message box will be shown.
![]() Stay playing window on top of other windows
Stay playing window on top of other windows
![]() Enable click and type sound
:
If this option is selected, a sound will be played while running mouse and keyboard commands.
Enable click and type sound
:
If this option is selected, a sound will be played while running mouse and keyboard commands.
![]() User real cursor for click and type
:
If the actual mouse and keyboard cursor of your system are used,
the speed of mouse and keyboard actions will be much more than when the vUser cursors are used.
User real cursor for click and type
:
If the actual mouse and keyboard cursor of your system are used,
the speed of mouse and keyboard actions will be much more than when the vUser cursors are used.
![]() Use vUser cursor for click and type
Use vUser cursor for click and type
![]() Active password
:
If this option is enabled and a password is set, the only way to view the actions
of the Macro is to enter that password; this option does not affect running the Macro;
the only difference is that in the reports, the name of the commands will not be shown.
Active password
:
If this option is enabled and a password is set, the only way to view the actions
of the Macro is to enter that password; this option does not affect running the Macro;
the only difference is that in the reports, the name of the commands will not be shown.
This option is useful for situations in which you want to let someone else use the Macro, but not be able to change its actions.
![]() Current password
:
If the Macro has a password and you want to change it, you need to enter the current password in this box.
Current password
:
If the Macro has a password and you want to change it, you need to enter the current password in this box.
![]() New password
:
The new password that you want to use.
New password
:
The new password that you want to use.
![]() Repeat new password
:
Repeat new password
:
![]() Time Lock: Inactive the Macro after
:
By specifying a period, the Macro will only work up to that time, and after that,
it will be deactivated and can no longer be used. Using this option, you can rent your Macros.
Time Lock: Inactive the Macro after
:
By specifying a period, the Macro will only work up to that time, and after that,
it will be deactivated and can no longer be used. Using this option, you can rent your Macros.
![]() …Time Lock Key
:
By clicking on this option, a window will open, and you can enter a security key for the time lock.
…Time Lock Key
:
By clicking on this option, a window will open, and you can enter a security key for the time lock.
![]() Time Lock Massage
:
The message that will be shown to the user once the Macro’s time has expired.
This message can have five lines. You can leave each of them empty if you want.
Time Lock Massage
:
The message that will be shown to the user once the Macro’s time has expired.
This message can have five lines. You can leave each of them empty if you want.
![]() Version
:
You can use this section to specify a version number for your Macro. This number will be displayed in the Player application
Version
:
You can use this section to specify a version number for your Macro. This number will be displayed in the Player application
![]() Auto save log file
:
If this option is selected, the report of the Player application will be saved in a text file and at the same location as the Macro.
Auto save log file
:
If this option is selected, the report of the Player application will be saved in a text file and at the same location as the Macro.
![]() Only save comments:
If this option is selected, only the comments will be saved to the log file.
Only save comments:
If this option is selected, only the comments will be saved to the log file.
Settings Menu of the Editor
If you click on this menu item, the Settings Window of the editor application will open

If option number
![]() 1 is enabled, when you are inserting a Window & Control variable, the Editor window minimizes itself. The other two options can be used to change the position of the Editor windows. These windows are the ones that appear when you add a variable or click on a menu button. The window in the image is one of
these windows, and you can control its position using these options. If option number
1 is enabled, when you are inserting a Window & Control variable, the Editor window minimizes itself. The other two options can be used to change the position of the Editor windows. These windows are the ones that appear when you add a variable or click on a menu button. The window in the image is one of
these windows, and you can control its position using these options. If option number
![]() is selected, these windows will open in the middle of your desktop. If option number
is selected, these windows will open in the middle of your desktop. If option number
![]() is selected, the windows will open in the middle of the Main window of the Editor application.
is selected, the windows will open in the middle of the Main window of the Editor application.
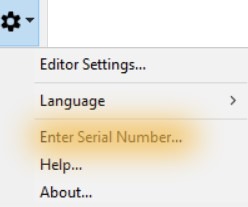
Changing the Language of the Editor
The Virtual User Software is delivered in English and Persian languages. If you want to change the language of the application, you can click on the “Setting” () button, and select the language that you want from the “Language” sub-menu.
Serial Number of the Editor Application
By clicking on this option, a window will open, and you can insert the serial number of the application.
The Help of the Editor
By clicking on this option, a window will open, and you can see the help file of the Editor application.

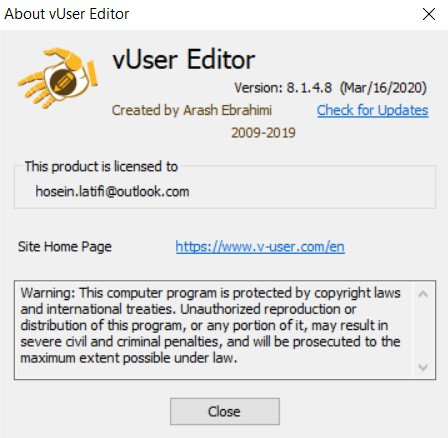
About the Editor
By clicking on this option, a window will open, and you can see some information about the Editor application.
The information includes the version of the Editor application you’re using.
Mouse Command
If you want to ask a question from the user, you can use this action.
Description of the parameters:
![]() Title:
The title of the question box window. You can the % sign to choose different variables.
Title:
The title of the question box window. You can the % sign to choose different variables.
![]() Question:
You can use the % sign to choose different variables. If you use '
Question:
You can use the % sign to choose different variables. If you use '
![]() Text Alignment Left:
If you select this option, the message will be left aligned.
Text Alignment Left:
If you select this option, the message will be left aligned.
![]() Text Alignment Right:
If you select this option, the message will be right aligned
Text Alignment Right:
If you select this option, the message will be right aligned
![]() Right To Left Reading:
If you select this option, all the contents of the window will be displayed from right to left.
Right To Left Reading:
If you select this option, all the contents of the window will be displayed from right to left.
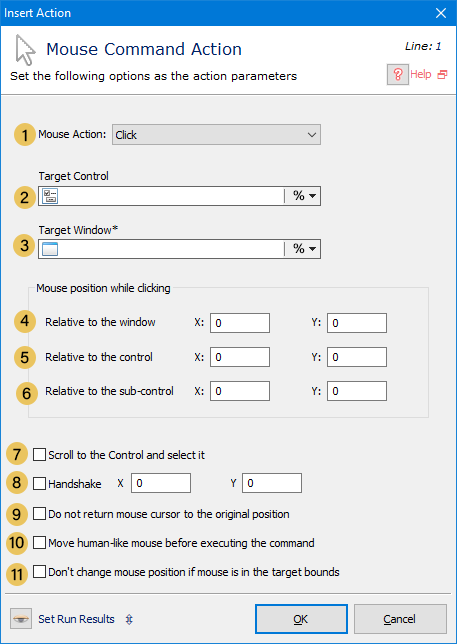
Mouse Event
This action can be used to send mouse commands to the screen (commands like Click, Double Click, Right Click, …).
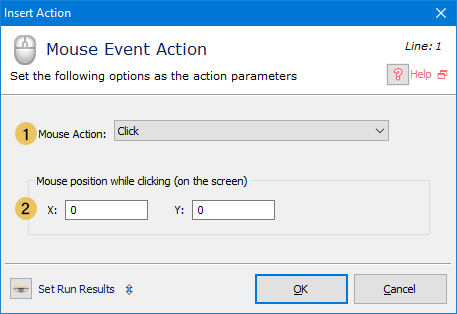
Description of the parameters:
![]() Mouse Action:
The command that the mouse needs to send. This command can be one of the following:
Mouse Action:
The command that the mouse needs to send. This command can be one of the following:
Click / Double Click / Right Click / Right Button Double Click / Middle Click / Middle Button Double Click / Left Button Down / Left Button Up / Right Button Down / Right Button Up / Middle Button Down / Middle Button Up / Wheel Down / Wheel Up
![]() (Mouse Position While Clicking (On The Screen:
The mouse command will be sent in this X, Y coordinates on the screen. The coordinates will be calculated from the “top-left” of the screen.
(Mouse Position While Clicking (On The Screen:
The mouse command will be sent in this X, Y coordinates on the screen. The coordinates will be calculated from the “top-left” of the screen.
Mouse Move
With this action, you can move the real mouse pointer of the system.
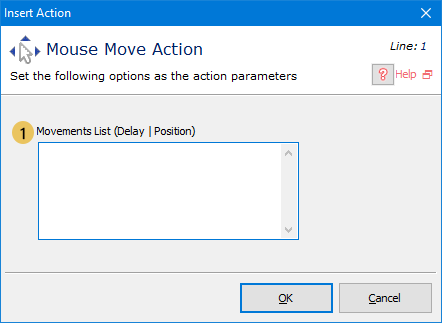
Description of the parameters:
![]() (Movements List (Delay | Position:
A list of mouse movements that contains the delay (in milliseconds) and X, Y coordinates of the next position of the mouse.
(Movements List (Delay | Position:
A list of mouse movements that contains the delay (in milliseconds) and X, Y coordinates of the next position of the mouse.
Keyboard Command
This action can be used to send keyboard commands (almost all of the keys) to a specific window or Control.
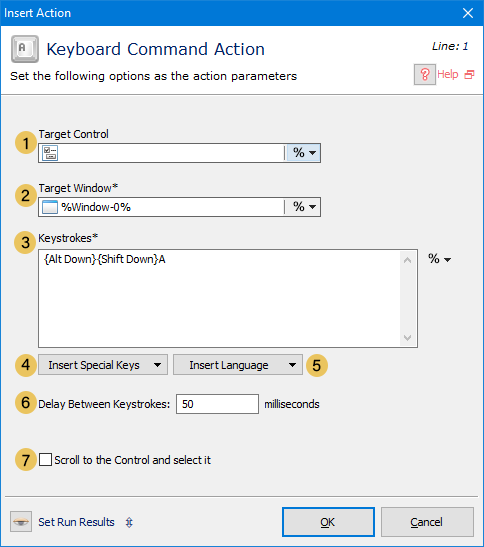
Description of the parameters:
![]() Target Control:
The keyboard commands will be sent to this Control. By Control, we mean the specific sections (like buttons, for example) of the window. You can use the percent sign (%) to select the target control.
Target Control:
The keyboard commands will be sent to this Control. By Control, we mean the specific sections (like buttons, for example) of the window. You can use the percent sign (%) to select the target control.
![]() Target Window:
The keyboard commands will be sent to this window. You can use the percent sign (%) to select the target window.
Target Window:
The keyboard commands will be sent to this window. You can use the percent sign (%) to select the target window.
![]() KeyStrokes:
List of the keys that must be pushed in this action.
KeyStrokes:
List of the keys that must be pushed in this action.
![]() Insert Special Keys:
You can use this button to insert Special Keys to the list of KeyStrokes.
Insert Special Keys:
You can use this button to insert Special Keys to the list of KeyStrokes.
![]() Insert Language:
You can use this key to insert language into the list of KeyStrokes.
Insert Language:
You can use this key to insert language into the list of KeyStrokes.
![]() (Delay Between Key Strokes (Milliseconds:
This delay will be inserted between each of the keystrokes.
(Delay Between Key Strokes (Milliseconds:
This delay will be inserted between each of the keystrokes.
![]() Scroll to the Control and select it:
If you choose this option, the macro will travel to the specific Control and selects it.
Scroll to the Control and select it:
If you choose this option, the macro will travel to the specific Control and selects it.
Keyboard Event
This action can be used to send keyboard commands (almost all of the keys).
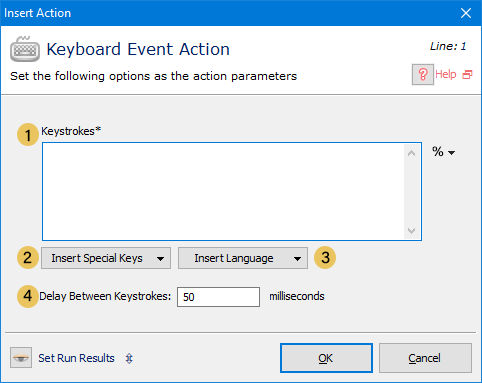
Description of the parameters:
![]() KeyStrokes:
List of the keys that must be pushed in this action.
KeyStrokes:
List of the keys that must be pushed in this action.
![]() Insert Special Keys:
You can use this button to insert Special Keys to the list of KeyStrokes.
Insert Special Keys:
You can use this button to insert Special Keys to the list of KeyStrokes.
![]() Insert Language:
You can use this key to insert language into the list of KeyStrokes.
Insert Language:
You can use this key to insert language into the list of KeyStrokes.
![]() (Delay Between Strokes (Milliseconds:
This delay will be inserted between each of the keystrokes.
This value is in milliseconds (one-thousandth of a second).
(Delay Between Strokes (Milliseconds:
This delay will be inserted between each of the keystrokes.
This value is in milliseconds (one-thousandth of a second).
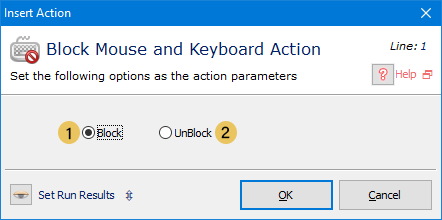
Block Mouse and Keyboard
This action can be used to block the Mouse and Keyboard commands. The user will not even be able to move the mouse pointer on the screen. You should note that if an error occurs, the Player application will unblock mouse or keyboard. The user can also use Alt + Ctrl + Delete key combination and unblock the mouse or keyboard.
Description of the parameters:
![]() Block:
By selecting this option, you can block mouse and keyboard.
Block:
By selecting this option, you can block mouse and keyboard.
![]() UnBlock:
Selecting this option unblocks the mouse and keyboard.
UnBlock:
Selecting this option unblocks the mouse and keyboard.
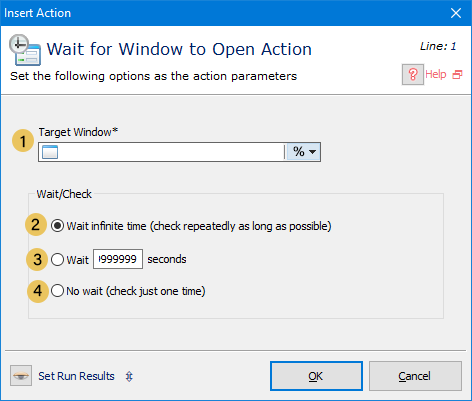
Wait for Window to Open
You can use this action when you want the Player application to wait for a specific window to open.
As an example, let's assume you have saved a Mouse Action, that clicks on the "Ok" button of a Login Window; when the Macro reaches this action, what happens if the Login window hasn't been opened yet? Naturally, the Player will not find the button and shows an error. To address this situation, you can insert a "Delay," but in different circumstances (like, for example, when your systems become slow), you might need to set various delays. Therefore, we have added this action, after the Macro reaches this, it will wait for the window to open, and then runs the next action. Therefore, if you use this action in the example that we've provided, the Macro will wait for the login window to open, there will be no errors.
Description of the parameters:
![]() Target Window:
If you select this option, the Macro will wait until the window opens.
Target Window:
If you select this option, the Macro will wait until the window opens.
![]() (Wait Infinite Time (Check Repeatedly as long as Possible:
If you select this option, the Macro will wait until the window opens.
(Wait Infinite Time (Check Repeatedly as long as Possible:
If you select this option, the Macro will wait until the window opens.
![]() Wait Seconds:
By selecting this option and specifying the amount, the Macro will only wait that long for the window to open.
Wait Seconds:
By selecting this option and specifying the amount, the Macro will only wait that long for the window to open.
![]() (No Wait (Check Just One Time:
If this option is enabled, the check will only be performed one time.
(No Wait (Check Just One Time:
If this option is enabled, the check will only be performed one time.
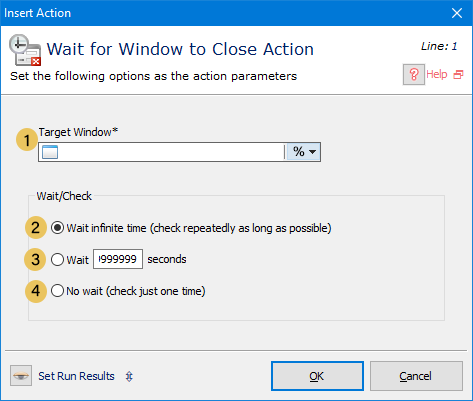
Wait for Window to Close
You can use this action when you want the Player application to wait for a specific window to Close (or hide from the view).
Description of the parameters:
![]() Target Window:
The window for which the Player should wait. You can use the percent (%) button to specify this window.
Target Window:
The window for which the Player should wait. You can use the percent (%) button to specify this window.
![]() (Wait Infinite Time (Check Repeatedly as long as Possible:
If you select this option, the Macro will wait until the window closes.
(Wait Infinite Time (Check Repeatedly as long as Possible:
If you select this option, the Macro will wait until the window closes.
![]() Wait Seconds:
By selecting this option and specifying the amount, the Macro will only wait that long for the window to close.
Wait Seconds:
By selecting this option and specifying the amount, the Macro will only wait that long for the window to close.
![]() (No Wait (Check Just One Time:
If this option is enabled, the check will only be performed once.
(No Wait (Check Just One Time:
If this option is enabled, the check will only be performed once.
Set Window to Stay on Top
Using this action, you can force a Target Window to stay on top of all other windows and it never goes behind them.
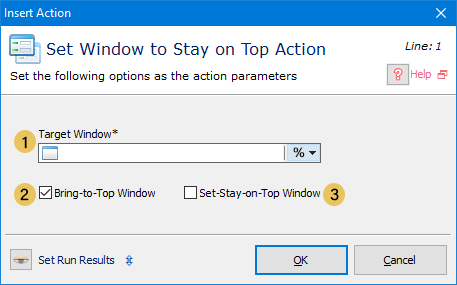
Description of the parameters:
![]() Target Window:
The window that you want to stay on top. You can use the percent (%) button to specify this window.
Target Window:
The window that you want to stay on top. You can use the percent (%) button to specify this window.
![]() Bring-to-Top Window:
If you select this option, the Target Window will come to the top.
Bring-to-Top Window:
If you select this option, the Target Window will come to the top.
![]() Set-Stay-on-Top Window:
By selecting this option, the Target Window will always stay on top.
Set-Stay-on-Top Window:
By selecting this option, the Target Window will always stay on top.
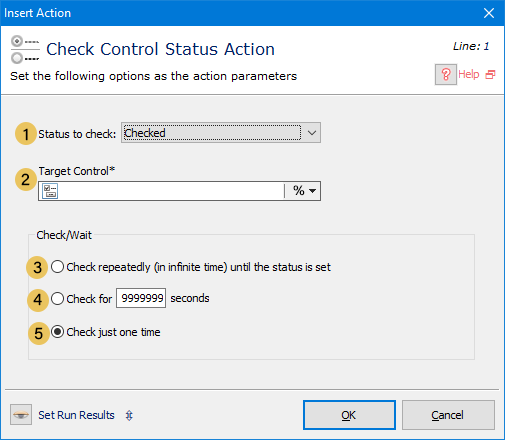
Check Control Status
This action can check the controls (different components of a window). These states include Checked, Visibility, whether the Control is Enabled or not, and whether the Control is Focused or not. Also, this action can wait for Control to reach the specified state.
Description of the parameters:
![]() Status to Check:
The different states of a Control can be selected here.
Status to Check:
The different states of a Control can be selected here.
- Focused
- UnFocused
- Checked
- UnChecked
- Enabled
- Disabled
- Grayed
![]() Target Control:
The Control that you want to check its state. You can use the percent (%) button to specify this window.
Target Control:
The Control that you want to check its state. You can use the percent (%) button to specify this window.
![]() Check Repeatedly (In Infinite Time) Until The Status Is Set:
If you select this option, the Macro will continue to check until the Control reaches the selected state.
Check Repeatedly (In Infinite Time) Until The Status Is Set:
If you select this option, the Macro will continue to check until the Control reaches the selected state.
![]() Check for Seconds:
By selecting this option, the Macro is going to check only for the specified time.
Check for Seconds:
By selecting this option, the Macro is going to check only for the specified time.
![]() Check Just One Time:
If this option is selected, the Macro will check the state of the Control only once.
Check Just One Time:
If this option is selected, the Macro will check the state of the Control only once.
Get Text from Window or Control
This action can check the controls (different components of a window). These states include Checked, Visibility, whether the Control is Enabled or not, and whether the Control is Focused or not. Also, this action can wait for Control to reach the specified state.
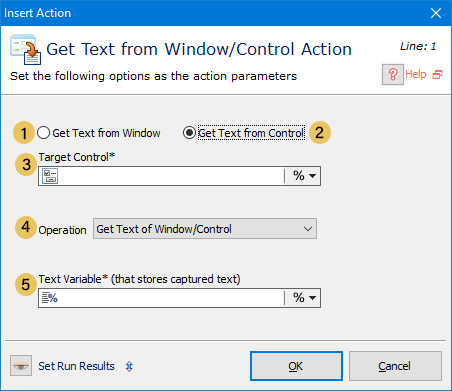
Description of the parameters:
![]() Status to Check:
The different states of a Control can be selected here.
Status to Check:
The different states of a Control can be selected here.
- Focused
- UnFocused
- Checked
- UnChecked
- Enabled
- Disabled
- Grayed
![]() Target Control:
The Control that you want to check its state. You can use the percent (%) button to specify this window.
Target Control:
The Control that you want to check its state. You can use the percent (%) button to specify this window.
![]() Check Repeatedly (In Infinite Time) Until The Status Is Set:
If you select this option, the Macro will continue to check until the Control reaches the selected state.
Check Repeatedly (In Infinite Time) Until The Status Is Set:
If you select this option, the Macro will continue to check until the Control reaches the selected state.
![]() Check for Seconds:
By selecting this option, the Macro is going to check only for the specified time.
Check for Seconds:
By selecting this option, the Macro is going to check only for the specified time.
![]() Check Just One Time:
If this option is selected, the Macro will check the state of the Control only once.
Check Just One Time:
If this option is selected, the Macro will check the state of the Control only once.
Set Text into Window or Control
If you want to change the text of a control or window, you can use this action.
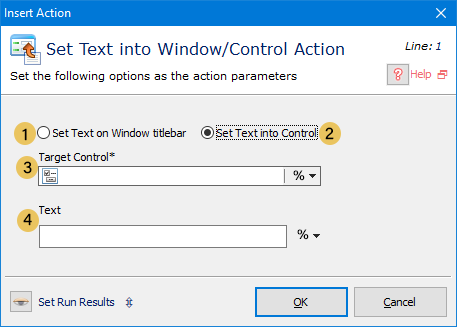
Description of the parameters:
![]() Set Text on Window Titlebar:
If you select this option, the Title of the window will change to the value you specify.
Set Text on Window Titlebar:
If you select this option, the Title of the window will change to the value you specify.
![]() Set Text into Control:
If you select this option, the text of the Control will change to the value you specify.
Set Text into Control:
If you select this option, the text of the Control will change to the value you specify.
![]() Target Control / Target Window:
The Target Control/Window that you want to change its text. You can use the % sign at the right of this field to select one of the existing controls.
Target Control / Target Window:
The Target Control/Window that you want to change its text. You can use the % sign at the right of this field to select one of the existing controls.
![]() Text Variable:
The text you want to set to the Control or Target Window. You can use the % sign at the right of this field to select the variable you want.
Text Variable:
The text you want to set to the Control or Target Window. You can use the % sign at the right of this field to select the variable you want.
Find and Replace Text
This action can search a Text Variable and replace the character you choose, with the character you specify. You can change the parameters of this action to get the result that you want. If you just want to use the search part of this action, once the action finds the text or character that you’ve specified, the result of the action will be a success, and you can use it to run the next step.

Description of the parameters:
![]() Text Variable:
The Text variable that you want to use.
Text Variable:
The Text variable that you want to use.
![]() Text to Find:
The Text or Character that you want to find. If you leave this field empty, you can check if the Text Variable has any value.
Text to Find:
The Text or Character that you want to find. If you leave this field empty, you can check if the Text Variable has any value.
![]() Case Sensitive:
If you select this option, the search will be sensitive to Upper/Lower cases.
Case Sensitive:
If you select this option, the search will be sensitive to Upper/Lower cases.
![]() Left to Right:
The search will start from the leftmost character
Left to Right:
The search will start from the leftmost character
![]() Right to Left:
The search will start from the rightmost character
Right to Left:
The search will start from the rightmost character
![]() Pass If Text Found in:
If the text you’re looking for is found in the position you specify, the action will succeed. You can set this parameter to one of the following options:
Pass If Text Found in:
If the text you’re looking for is found in the position you specify, the action will succeed. You can set this parameter to one of the following options:
- Anywhere
- First Character
- First Character Add: (from the first character plus the number you specify)
- Last Character: Only if text is found at the end point of the variable.
- Last Character Sub: (from the last character minus the number you specify)
- Exact Match
![]() Replace:
The new text that is going to replace the old one.
Replace:
The new text that is going to replace the old one.
![]() Replace With:
The new text that is going to replace the old one.
Replace With:
The new text that is going to replace the old one.
![]() Replace All:
By selecting this option, any occurrences of the old text will be replaced with the new one.
Replace All:
By selecting this option, any occurrences of the old text will be replaced with the new one.
![]() Replace Once:
By selecting this option, only the first occurrence of the old text will be replaced with the new one.
Replace Once:
By selecting this option, only the first occurrence of the old text will be replaced with the new one.
Change Text
If you want to change the value of a Text Variable, you can use this action.
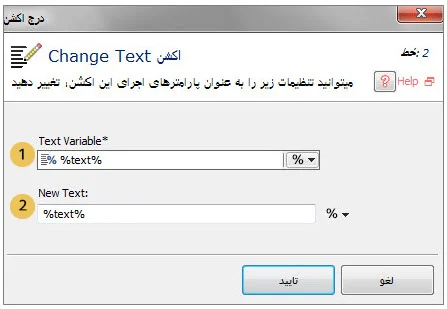
Description of the parameters:
![]() Text Variable:
The variable that you want to change its value. You can use the % sign on the right side of this field to select the variable that you want.
Text Variable:
The variable that you want to change its value. You can use the % sign on the right side of this field to select the variable that you want.
![]() -no operation-:
The operation that you want to run on the selected text. You can select one of the following options (note that by selecting any of the following options, you will not be able to add a new text)
-no operation-:
The operation that you want to run on the selected text. You can select one of the following options (note that by selecting any of the following options, you will not be able to add a new text)
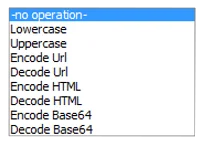
- Lowercase
- Uppercase
- Encode Url
- Decode Url
- Encode HTML
- Decode HTML
- Encode Base 64
- Decode Base 64
![]() New Text:
The new text you want to replace the old one with. You can use the percent sign to select the existing variables.
New Text:
The new text you want to replace the old one with. You can use the percent sign to select the existing variables.
Change Clipboard Text
If you want to change the Clipboard text, you can use this action.
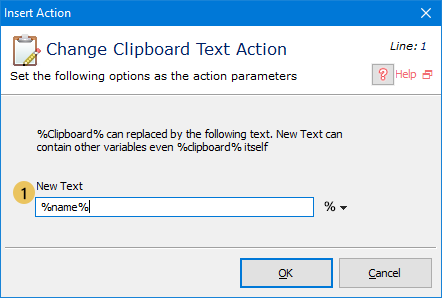
Description of the parameters:
![]() New Text:
The new text you want to insert in the clipboard.
New Text:
The new text you want to insert in the clipboard.
Text to Number
Using this action, you can extract the Numbers from a Text variable and save the result to a Numeric Variable.
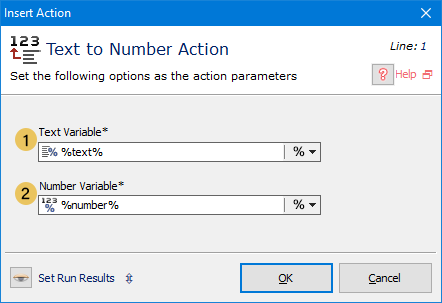
Description of the parameters:
![]() Text Variable:
The source of the operation. You can use the % sign to select the variable that you want.
Text Variable:
The source of the operation. You can use the % sign to select the variable that you want.
![]() Number Variable:
The destination of the operation. The extracted numbers will be saved here.
Number Variable:
The destination of the operation. The extracted numbers will be saved here.
Number to Text
Using this action, you can insert a number variable into a text variable.
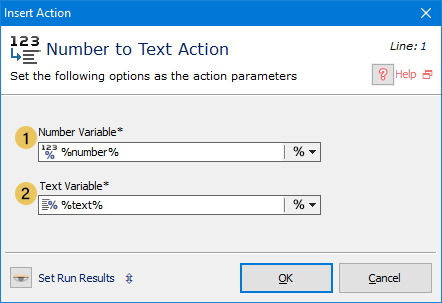
Description of the parameters:
![]() Number Variable:
The source of the operation. You can use the % sign to select the variable that you want.
Number Variable:
The source of the operation. You can use the % sign to select the variable that you want.
![]() Text Variable:
The destination of the operation. The extracted numbers will be saved here. You can use the % sign to select the variable that you want
Text Variable:
The destination of the operation. The extracted numbers will be saved here. You can use the % sign to select the variable that you want
Check Number
Using this action, you can compare two numbers.
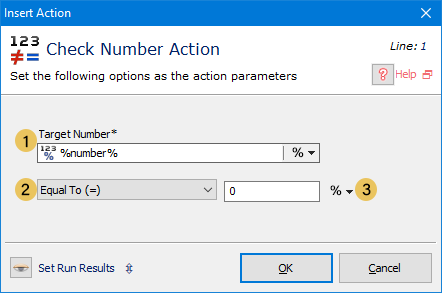
Description of the parameters:
![]() Target Number:
The variable that you want to compare its value with another number. You can use the % sign to select the variable that you want
Target Number:
The variable that you want to compare its value with another number. You can use the % sign to select the variable that you want
![]() Conditions Can be one of the following:
Conditions Can be one of the following:
- Equal To
- Smaller Than
- Greater Than
- Equal to and Smaller Than
- Equal to and Greater Than
![]() The number to which you want to compare
You can use the % sign to select the variable that you want.
The number to which you want to compare
You can use the % sign to select the variable that you want.
Increase Number
Using this action, you can increase a Number variable.
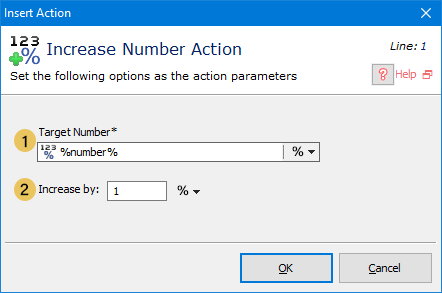
Description of the parameters:
![]() Target Number:
The variable that you want its value to increase. You can use the % sign to select the variable that you want
Target Number:
The variable that you want its value to increase. You can use the % sign to select the variable that you want
![]() Increase by:
The amount by which you want to increase the value. You can use the % sign to select the variable that you want
Increase by:
The amount by which you want to increase the value. You can use the % sign to select the variable that you want
Decrease Number
Using this action, you can decrease a Number variable.
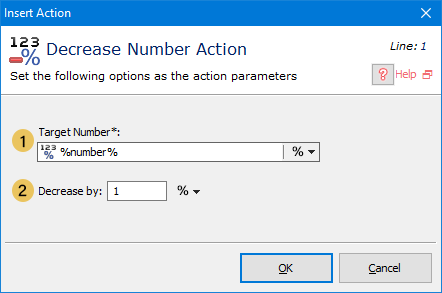
Description of the parameters:
![]() Target Number:
The variable that you want its value to decrease. You can use the % sign to select the variable that you want
Target Number:
The variable that you want its value to decrease. You can use the % sign to select the variable that you want
![]() Decrease by:
The amount by which you want to decrease the value. You can use the % sign to select the variable that you want
Decrease by:
The amount by which you want to decrease the value. You can use the % sign to select the variable that you want
Change Number
Using this action, you can perform arithmetic operations on two numbers or numeric variables.

Description of the parameters:
![]() Numeric Variable:
The result of the arithmetic operations will be placed in this variable. You can use the % sign to select the variable that you want
Numeric Variable:
The result of the arithmetic operations will be placed in this variable. You can use the % sign to select the variable that you want
![]() First Number:
You can insert a number or use the % sign to select the variable that you want.
First Number:
You can insert a number or use the % sign to select the variable that you want.
![]() Operator:
Can be one of the following
Operator:
Can be one of the following
- ( +
- _
- *
- /
- MOD (the remainder of the division of two numbers)
![]() Second Number:
You can insert a number or use the % sign to select the variable that you want.
Second Number:
You can insert a number or use the % sign to select the variable that you want.
Open Browser
Use this action when you want to open a browser
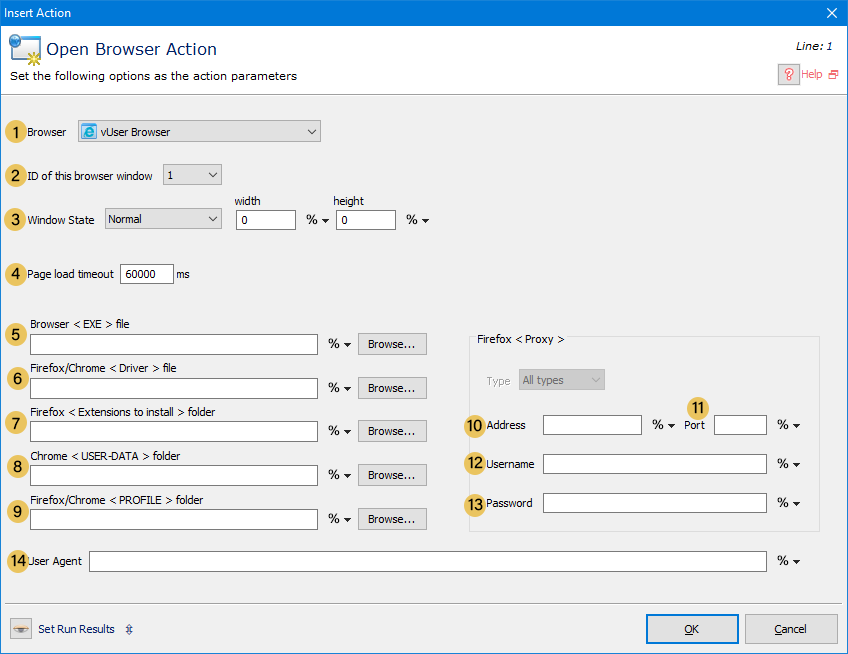
Description of the parameters:
![]() Browser:
You can select the browser you want from one of the following options
Browser:
You can select the browser you want from one of the following options
vUserBrowser / Internet Explorer / Firefox 32bits – X86 / Firefox 64Bits – X64 / Chrome
![]() Id Of This Browser Window:
When you want to use multiple browsers, you can use this option to set an Id for each of them, and then you can refer to each specific browser using the appropriate Id.
Id Of This Browser Window:
When you want to use multiple browsers, you can use this option to set an Id for each of them, and then you can refer to each specific browser using the appropriate Id.
![]() Window State:
The state of the browser window. This can be one of the following:
Window State:
The state of the browser window. This can be one of the following:
- Normal: if you select this option, once opened, the browser will stay at its normal size.
- Maximize: once opened, the browser will immediately maximize
- Minimize: one opened, the browser will immediately minimize.
![]() Page Load timeout:
The time to wait for the site to open. If the site is not opened at the specified time, an error will be shown. The time is based on milli seconds.
Page Load timeout:
The time to wait for the site to open. If the site is not opened at the specified time, an error will be shown. The time is based on milli seconds.
![]() Browser <EXE> File:
If the browser is based on the “gecko” or “Selenium” driver, you can use this option to select it. You can use the % sign to insert the variable that you want in this field. Also, you can use the Browse button and look for the file.
Browser <EXE> File:
If the browser is based on the “gecko” or “Selenium” driver, you can use this option to select it. You can use the % sign to insert the variable that you want in this field. Also, you can use the Browse button and look for the file.
![]() Firefox / Chrome <Driver> File:
When the driver of browser is not placed in its default location, insert the path of the driver here. You can use the % sign to insert the variable that you want in this field. Also, you can use the Browse button and look for the file.
Firefox / Chrome <Driver> File:
When the driver of browser is not placed in its default location, insert the path of the driver here. You can use the % sign to insert the variable that you want in this field. Also, you can use the Browse button and look for the file.
![]() Firefox <Extensions to install> folder:
The extensions that you want to add to Firefox are placed in a folder, and here, you specify the path of that folder. You can use the % sign to insert the variable that you want in this field. Also, you can use the Browse button and look for the file.
Firefox <Extensions to install> folder:
The extensions that you want to add to Firefox are placed in a folder, and here, you specify the path of that folder. You can use the % sign to insert the variable that you want in this field. Also, you can use the Browse button and look for the file.
![]() Chrome <USER-DATA> folder:
Each browser has a cache memory, and uses it to save information like usernames and passwords. Since the Virtual User Software opens the browsers without cache, if you’re using the Chrome Browser, you can place the cache folder here, so that when you use this browser to open the website, you can access your cached information. You can click on Browse to select the folder.
Chrome <USER-DATA> folder:
Each browser has a cache memory, and uses it to save information like usernames and passwords. Since the Virtual User Software opens the browsers without cache, if you’re using the Chrome Browser, you can place the cache folder here, so that when you use this browser to open the website, you can access your cached information. You can click on Browse to select the folder.
![]() Firefox / Chrome <PROFILE> folder:
Each browser has a cache memory, and uses it to save information like usernames and passwords. Since the Virtual User Software opens the browsers without cache, if you’re using Chrome or Firefox Browsers, you can place the cache folder here, so that when you use them browser to open the website, you can access your cached information. You can click on Browse to select the
folder.
Firefox / Chrome <PROFILE> folder:
Each browser has a cache memory, and uses it to save information like usernames and passwords. Since the Virtual User Software opens the browsers without cache, if you’re using Chrome or Firefox Browsers, you can place the cache folder here, so that when you use them browser to open the website, you can access your cached information. You can click on Browse to select the
folder.
![]() Address:
If you’re using proxy servers, you can insert their address here. You can use the % sign to select the variable that you want.
Address:
If you’re using proxy servers, you can insert their address here. You can use the % sign to select the variable that you want.
![]() Port:
If you’re using proxy servers, you can insert the port here. You can use the % sign to select the variable that you want.
Port:
If you’re using proxy servers, you can insert the port here. You can use the % sign to select the variable that you want.
![]() Usename:
If you’re using proxy servers, you can insert the username here. You can use the % sign to select the variable that you want.
Usename:
If you’re using proxy servers, you can insert the username here. You can use the % sign to select the variable that you want.
![]() Password:
If you’re using proxy servers, you can insert the password here. You can use the % sign to select the variable that you want.
Password:
If you’re using proxy servers, you can insert the password here. You can use the % sign to select the variable that you want.
Go To URL And Navigate
You can use this action to direct the browser to an address.
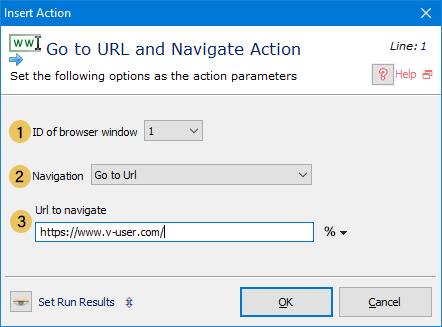
Description of the parameters:
![]() ID Of Browser Window:
The Id of the browser with which this action wants to communicate
ID Of Browser Window:
The Id of the browser with which this action wants to communicate
![]() Navigation:
You can specify the navigation method here. This can be one of the following:
Navigation:
You can specify the navigation method here. This can be one of the following:
- Go To URL
- Clear Cash And Go To URL
- Go Back
- Go Forward
- Reload / Refresh
- Clear Cash And Reload / Refresh
![]() URL To Navigate:
The address of the page that you want to open. You can use the % sign to use the variable that you want.
URL To Navigate:
The address of the page that you want to open. You can use the % sign to use the variable that you want.
Wait for Page or Element To Load
You can use this action to direct the browser to an address.
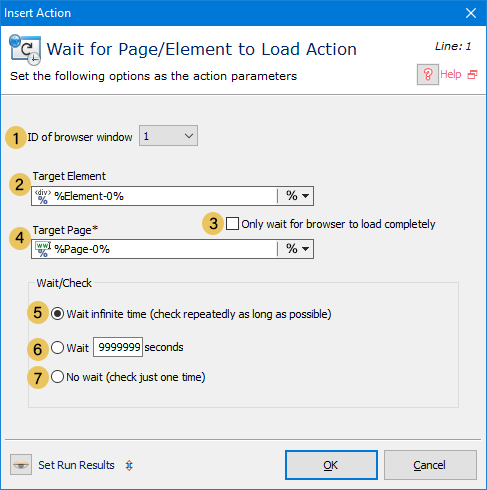
Description of the parameters:
![]() ID Of Browser Window:
The Id of the browser with which this action wants to communicate
ID Of Browser Window:
The Id of the browser with which this action wants to communicate
![]() Navigation:
You can specify the navigation method here. This can be one of the following:
Navigation:
You can specify the navigation method here. This can be one of the following:
- Go To URL
- Clear Cash And Go To URL
- Go Back
- Go Forward
- Reload / Refresh
- Clear Cash And Reload / Refresh
![]() URL To Navigate:
The address of the page that you want to open. You can use the % sign to use the variable that you want.
URL To Navigate:
The address of the page that you want to open. You can use the % sign to use the variable that you want.
Mouse Actions on Web-Pages
You can use this action to wait for an element to open or wait for the browser to become active.
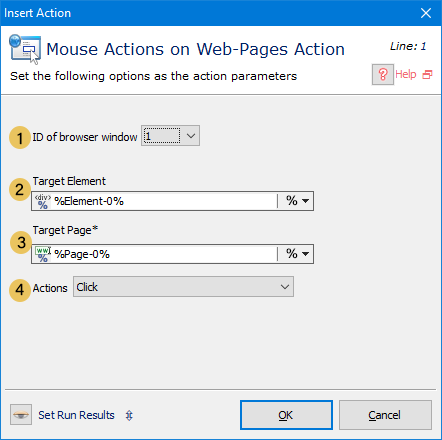
Description of the parameters:
![]() ID Of Browser Window:
The Id of the browser with which this action wants to communicate
ID Of Browser Window:
The Id of the browser with which this action wants to communicate
![]() Target Element:
The element on which you want to perform the action. You can use the % sign to use the variable that you want.
Target Element:
The element on which you want to perform the action. You can use the % sign to use the variable that you want.
![]() Target Page:
The page that you want to select one of its elements. You can use the % sign to select the variable that you want.
Target Page:
The page that you want to select one of its elements. You can use the % sign to select the variable that you want.
![]() Action:
The Mouse action you want to perform. Can be one of the following:
Action:
The Mouse action you want to perform. Can be one of the following:
- Click
- Hover
- Focus
- (Check (CheckBox
- (UnCheck (CheckBox
- (Select (Radio Button
- (Change Item (Drop – Down List / Combobox: ) (can be based on item position or item value)
- Scroll Down
- Scroll Up
Set Text Into Web-Input-Fields
You can use this action to insert some text into Input fields.
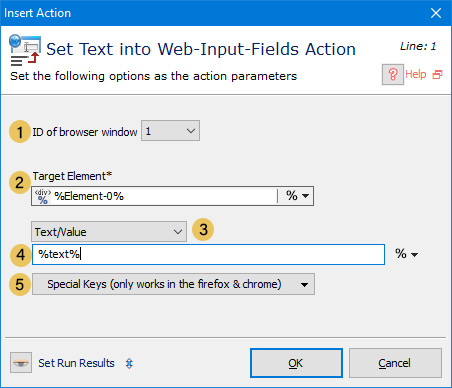
Description of the parameters:
![]() ID Of Browser Window:
The Id of the browser with which this action wants to communicate
ID Of Browser Window:
The Id of the browser with which this action wants to communicate
![]() You can insert the text to the “Value” or “Attribute” of a web element.
You can insert the text to the “Value” or “Attribute” of a web element.
![]()
![]() Text:
The text you want to insert in the element. You can use the % sign to select the variable that you want.
Text:
The text you want to insert in the element. You can use the % sign to select the variable that you want.
![]() Special Keys (Only Works in The FireFox and Chrome):
You can insert special keys in the text you want to insert. (keys like: Enter, Arrow Keys, Enter, Tab, Escape, PageDown, PageUp and Delete)
Special Keys (Only Works in The FireFox and Chrome):
You can insert special keys in the text you want to insert. (keys like: Enter, Arrow Keys, Enter, Tab, Escape, PageDown, PageUp and Delete)
Get Data From Web-Elements
You can use this action to extract some value from a website element.
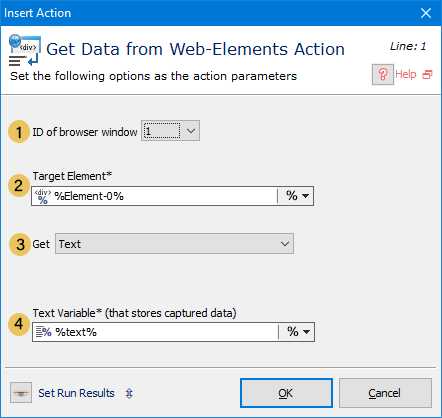
Description of the parameters:
![]() ID Of Browser Window:
The Id of the browser with which this action wants to communicate
ID Of Browser Window:
The Id of the browser with which this action wants to communicate
![]() Target Element:
The element that you want to extract its information. You can use the % sign to select the variable you want
Target Element:
The element that you want to extract its information. You can use the % sign to select the variable you want
![]() Get:
The type of the information you want to extract.
Get:
The type of the information you want to extract.
Can be one of the following:
- Text
- Value
- Specific Attribute: (like Class Name)
- Inner HTML
- Inner HTML And Element Itself
- Element HTML
![]() Text Variable:
The extracted information will be saved in this variable. You can also save the value to the Clipboard.
Text Variable:
The extracted information will be saved in this variable. You can also save the value to the Clipboard.
Get Current URL
You can use this action to copy the current address of the browser and save it in a text variable.
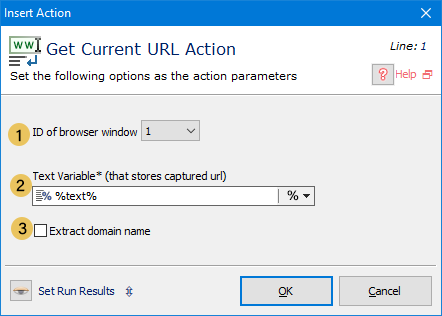
Description of the parameters:
![]() ID Of Browser Window:
The Id of the browser with which this action wants to communicate.
ID Of Browser Window:
The Id of the browser with which this action wants to communicate.
![]() Text Variable:
The variable that you want to save the address to. You can use the % sign to select the variable that you want.
Text Variable:
The variable that you want to save the address to. You can use the % sign to select the variable that you want.
![]() Extract Domain Name:
By selecting this option, the domain name will be extracted.
Extract Domain Name:
By selecting this option, the domain name will be extracted.
Close Browser
You can use this action to close the browser
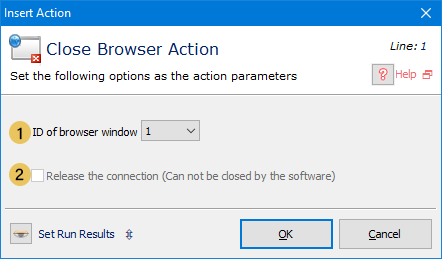
Description of the parameters:
![]() ID Of Browser Window:
The Id of the browser with which this action wants to close
ID Of Browser Window:
The Id of the browser with which this action wants to close
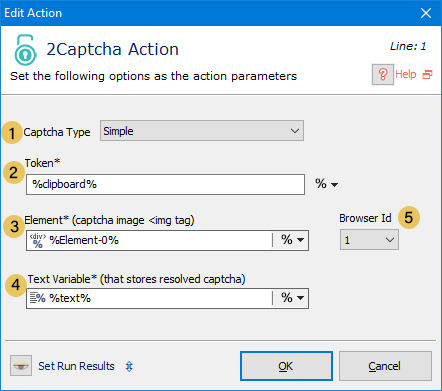
2Captcha
You can use this action if you want to bypass security codes using the 2Captcha API. This action can save the result to a text variable.
Description of the parameters:
![]() (Captcha Type (Simple:
At the moment, you can only use this action to solve simple captchas (those that don’t require a special calculation and are just a picture of some numbers.
(Captcha Type (Simple:
At the moment, you can only use this action to solve simple captchas (those that don’t require a special calculation and are just a picture of some numbers.
![]() Token:
A Unique ID that the 2Captcha website assigns to you when creating your account. You can insert the ID directly or use the % sign to use the variable that holds its value.
Token:
A Unique ID that the 2Captcha website assigns to you when creating your account. You can insert the ID directly or use the % sign to use the variable that holds its value.
![]() Element:
The picture on the website that contains the code. Note that the element that you select should start with IMG. You can use the % sign to select the variable you want.
Element:
The picture on the website that contains the code. Note that the element that you select should start with IMG. You can use the % sign to select the variable you want.
![]() Browser ID:
The Id if the browser the with which the action wants to communicate.
Browser ID:
The Id if the browser the with which the action wants to communicate.
![]() Text Variable:
The variable that the result of the captcha will be saved to. You can use the% sign to select the variable you want.
Text Variable:
The variable that the result of the captcha will be saved to. You can use the% sign to select the variable you want.
Open Program or Files
You can use this action to open a File or Program.
Open Program or Files.webp
Description of the parameters:
![]() File Name:
The name and the path of the file or program that you want to open. Instead of typing the path, you can use the Browse button to find the file. Or you can use the % sign to insert Text variables or Special Folders in this parameter.
File Name:
The name and the path of the file or program that you want to open. Instead of typing the path, you can use the Browse button to find the file. Or you can use the % sign to insert Text variables or Special Folders in this parameter.
![]() Use Explore.exe:
If this option is enabled, you can no longer insert the name and path of the file in the FileName field and while the Macro is running, the Windows Explorer will open. Using this option and putting the name of the program that needs to open, I like opening the My Computer and double clicking on the program to open it or in other words, this option helps in simulating the human
behavior.
Use Explore.exe:
If this option is enabled, you can no longer insert the name and path of the file in the FileName field and while the Macro is running, the Windows Explorer will open. Using this option and putting the name of the program that needs to open, I like opening the My Computer and double clicking on the program to open it or in other words, this option helps in simulating the human
behavior.
![]() Working Directory:
The path of the folder that the target application is going to use (to open or save some files). Using the % sign you can insert Text variables or Special Folders.
Working Directory:
The path of the folder that the target application is going to use (to open or save some files). Using the % sign you can insert Text variables or Special Folders.
![]() Parameters:
The parameters that the application starts with. For example, if you want to open the Notepad application and open simultaneously open a text file with its, you can put the Name & Path of that text file here. Using the % sign you can insert Text variables or Special Folders.
Parameters:
The parameters that the application starts with. For example, if you want to open the Notepad application and open simultaneously open a text file with its, you can put the Name & Path of that text file here. Using the % sign you can insert Text variables or Special Folders.
![]() Check Existance as File:
By selecting this option, the macro will check and if the file is not there, an error will be shown.
Check Existance as File:
By selecting this option, the macro will check and if the file is not there, an error will be shown.
![]() Execution Verb:
Using this parameter, you can change the execution method of the file or program. If you right click on a file or program, you will see some of these options. The parameter can be one of the following:
Execution Verb:
Using this parameter, you can change the execution method of the file or program. If you right click on a file or program, you will see some of these options. The parameter can be one of the following:
- Open:
- (RunAs (Run as Administrator
- Edit
- Preview
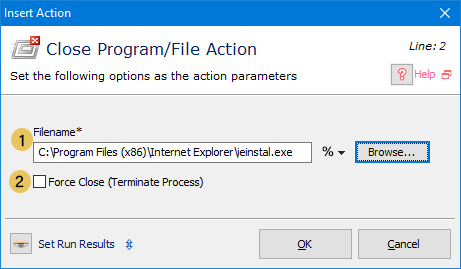
Close Program or Files
You can use this action to close a running File or Program.
Description of the parameters:
![]() FileName:
The name and the path of the file or program that you want to close. Instead of typing the path, you can use the Browse button to find the file. Or you can use the % sign to insert Text variables or Special Folders in this parameter.
FileName:
The name and the path of the file or program that you want to close. Instead of typing the path, you can use the Browse button to find the file. Or you can use the % sign to insert Text variables or Special Folders in this parameter.
![]() (Force Close (Terminate Process:
Using this option, you can force the program to close. This is useful in situations where there is a chance that the program will not respond to the commands.
(Force Close (Terminate Process:
Using this option, you can force the program to close. This is useful in situations where there is a chance that the program will not respond to the commands.
File Exists
You can use this action to check if a file exits in the specified path

Description of the parameters:
![]() Source:
The path and the name of the file that you want to check. Instead of typing the path, you can use the Browse button to find the file. Or you can use the % sign to insert Text variables or Special Folders in this parameter.
Source:
The path and the name of the file that you want to check. Instead of typing the path, you can use the Browse button to find the file. Or you can use the % sign to insert Text variables or Special Folders in this parameter.
Rename File
You can use this action to change the name of a Folder
Description of the parameters:
![]() Source:
The path and the name of the folder that you want to rename. Instead of typing the path, you can use the Browse button to find the folder. Or you can use the % sign to insert Text variables in this parameter.
Source:
The path and the name of the folder that you want to rename. Instead of typing the path, you can use the Browse button to find the folder. Or you can use the % sign to insert Text variables in this parameter.
![]() Destination:
The new name of the folder. You can use the % sign to select the variables that you want.
Destination:
The new name of the folder. You can use the % sign to select the variables that you want.
Copy Files
You can use this action to copy Files, Folders & Subfolders.
To copy one file, you need to put the full address and name of the of file in the “Source” parameter, and the destination folder and its name in the destination Folder (this can be the same as the source name). If you want to copy all the contents of folder (and subfolders), instead of the name of the file, you need to use *.* in the “Source” parameter, and the destination folder in the “Destination” parameter.
To copy a File

To copy all the contents of the folder
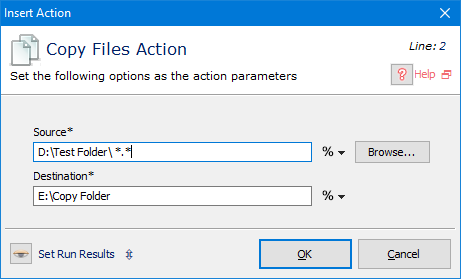
Description of the parameters:
We have described the parameters of this action at the beginning of this article. You can use the % sign to insert Text variables or Special Folders in this parameter.
Move Files
You can use this action to move a file.
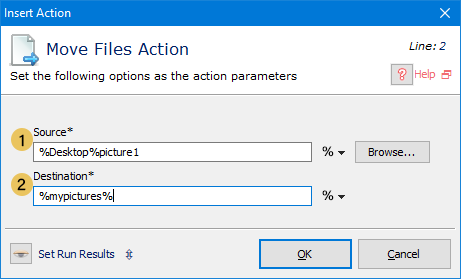
Description of the parameters:
![]() Source:
The path and the name of the file that you want to check. Instead of typing the path, you can use the Browse button to find the file. Or you can use the % sign to insert Text variables or Special Folders in this parameter.
Source:
The path and the name of the file that you want to check. Instead of typing the path, you can use the Browse button to find the file. Or you can use the % sign to insert Text variables or Special Folders in this parameter.
![]() Destination:
The path to where you want to move the file. You can use the % sign to insert Text variables or Special Folders in this parameter.
Destination:
The path to where you want to move the file. You can use the % sign to insert Text variables or Special Folders in this parameter.
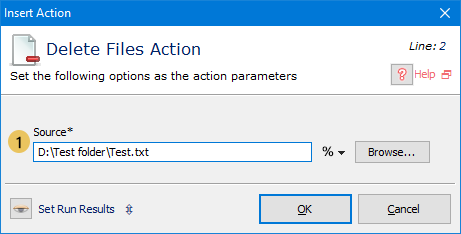
Delete Files
You can use this action to delete one or multiple files
Description of the parameters:
You need to insert the full path and the name of the file in the “Source” parameter. If you want to delete all the contents of a folder, you can insert *.* in the “Source” parameter.
You can use the % sign to choose text variable or Special Folder.
Create Shortcut
You can use this action to get the current URL address of the browser and save it to a text variable.
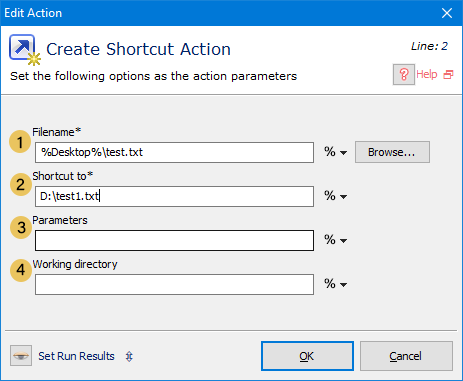
Description of the parameters:
![]() ID Of Browser Window:
The ID of the target borwser.
ID Of Browser Window:
The ID of the target borwser.
![]() Text Variable:
The URL will be saved to this variable.
Text Variable:
The URL will be saved to this variable.
![]() Extract Domain Name:
If you select this option, the domain name of the URL will be extracted.
Extract Domain Name:
If you select this option, the domain name of the URL will be extracted.
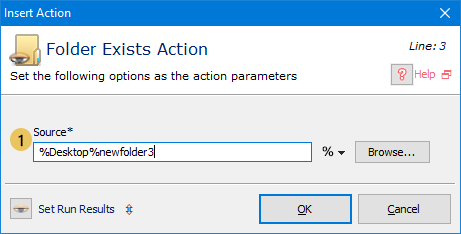
Folder Exists
You can use this action to check if a Folder exits in the specified path
Description of the parameters:
![]() Source:
The path and the name of the folder that you want to check. Instead of typing the path, you can use the Browse button to find the folder. Or you can use the % sign to insert Text variables in this parameter.
Source:
The path and the name of the folder that you want to check. Instead of typing the path, you can use the Browse button to find the folder. Or you can use the % sign to insert Text variables in this parameter.
Create Folder
You can use this action to create a Folder in the specified path
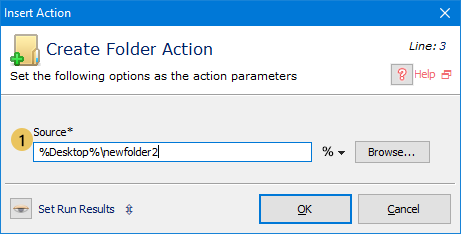
Description of the parameters:
![]() Source:
The path and the name of the folder that you want to create. Instead of typing the path, you can use the Browse button to find the folder. Or you can use the % sign to insert Text variables in this parameter.
Source:
The path and the name of the folder that you want to create. Instead of typing the path, you can use the Browse button to find the folder. Or you can use the % sign to insert Text variables in this parameter.
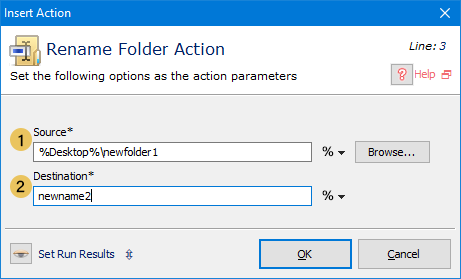
Rename Folder
You can use this action to change the name of a Folder
Description of the parameters:
![]() Source:
The path and the name of the folder that you want to rename. Instead of typing the path, you can use the Browse button to find the folder. Or you can use the % sign to insert Text variables in this parameter.
Source:
The path and the name of the folder that you want to rename. Instead of typing the path, you can use the Browse button to find the folder. Or you can use the % sign to insert Text variables in this parameter.
![]() Destination:
The new name of the folder. You can use the % sign to select the variables that you want.
Destination:
The new name of the folder. You can use the % sign to select the variables that you want.
Copy Folder
You can use this action to copy the folder and its contents.
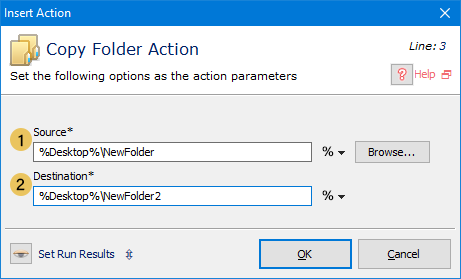
Description of the parameters:
![]() Source:
The full name and path of the folder that you want to copy. Instead of typing the path, you can use the Browse button to find the file. Or you can use the % sign to insert Text variables in this parameter.
Source:
The full name and path of the folder that you want to copy. Instead of typing the path, you can use the Browse button to find the file. Or you can use the % sign to insert Text variables in this parameter.
![]() Destination:
The full name and path of the destination. You can use the % sign to insert Text variables in this parameter.
Destination:
The full name and path of the destination. You can use the % sign to insert Text variables in this parameter.
Move Folders
You can use this action to move a folder and its content.
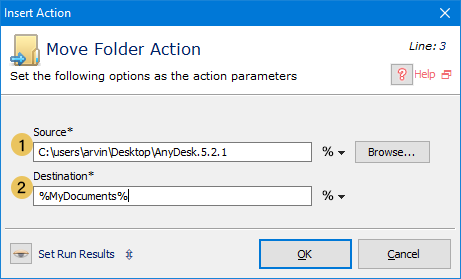
Description of the parameters:
![]() Source:
The path and the name of the folder that you want to move. Instead of typing the path, you can use the Browse button to find the folder. Or you can use the % sign to insert Text variables in this parameter.
Source:
The path and the name of the folder that you want to move. Instead of typing the path, you can use the Browse button to find the folder. Or you can use the % sign to insert Text variables in this parameter.
![]() Destination:
The path to where you want to move the folder. You can use the % sign to insert Text variables in this parameter.
Destination:
The path to where you want to move the folder. You can use the % sign to insert Text variables in this parameter.
Delete Folders
You can use this action to delete a folder and its contents.
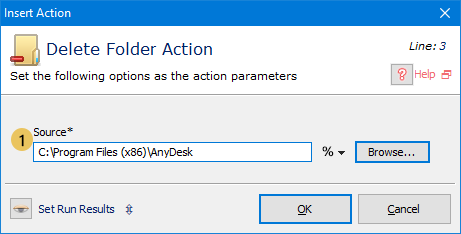
Description of the parameters:
![]() Source:
The full path and the name of the folder that you want to delete. You can use the % sign to choose a text variable or use the Browse button to insert the variable.
Source:
The full path and the name of the folder that you want to delete. You can use the % sign to choose a text variable or use the Browse button to insert the variable.
Open Create Excel File
You can use this action to open or create an Excel file.
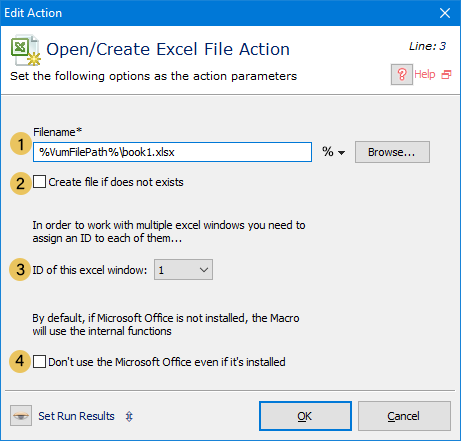
Description of the parameters:
![]() FileName:
The path and the name of the Excel file that you want to open or create. Instead of typing the path, you can use the Browse button to find the file. Or you can use the % sign to insert Text variables in this parameter.
FileName:
The path and the name of the Excel file that you want to open or create. Instead of typing the path, you can use the Browse button to find the file. Or you can use the % sign to insert Text variables in this parameter.
![]() Create File If Does Not Exists:
By selecting this option, if the Virtual User Software can not find the file at the specified location, it will create one with the specified name in the specified location.
Create File If Does Not Exists:
By selecting this option, if the Virtual User Software can not find the file at the specified location, it will create one with the specified name in the specified location.
![]() ID Of This Excel Window:
When you are working with multiple Excel files, you can use this parameter to refer to each one.
ID Of This Excel Window:
When you are working with multiple Excel files, you can use this parameter to refer to each one.
![]() Don’t use the Microsoft office software:
By selecting this option, the macro will not use the Microsoft Office.
Don’t use the Microsoft office software:
By selecting this option, the macro will not use the Microsoft Office.
Open Create Excel Sheet
You can use this action to open or create an Excel Sheet in a file that you’ve opened or created.
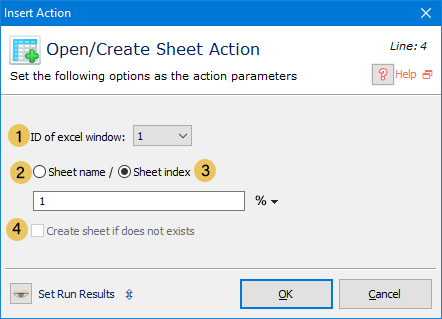
Description of the parameters:
![]() ID Of Excel Window:
The Id of the Excel file that you’ve opened or created in which want to create or open a sheet.
ID Of Excel Window:
The Id of the Excel file that you’ve opened or created in which want to create or open a sheet.
![]() Sheet Name:
By selecting this option, you can open or create a Sheet with its name. You can insert the name of the sheet in field that’s below this option or use the % sign to insert the variables you want.
Sheet Name:
By selecting this option, you can open or create a Sheet with its name. You can insert the name of the sheet in field that’s below this option or use the % sign to insert the variables you want.
![]() Sheet Index:
If instead of using the Sheet Name, you want to open it with its position, you can use this parameter. You can insert a number or use the % sign and insert a numeric variable.
Sheet Index:
If instead of using the Sheet Name, you want to open it with its position, you can use this parameter. You can insert a number or use the % sign and insert a numeric variable.
![]() Create Sheet If Does Not Exist:
By selecting this option, if the Macro can not find the sheet, it will create one with the specified name.
Create Sheet If Does Not Exist:
By selecting this option, if the Macro can not find the sheet, it will create one with the specified name.
Get Cell Text
When you want to save the contents of an Excel Cell in a text variable, you can use this action.
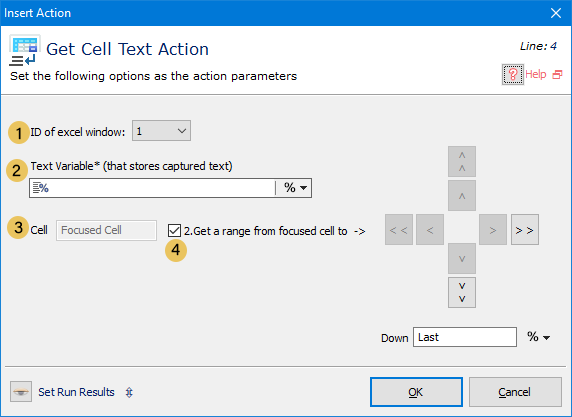
Description of the parameters:
![]() ID Of Excel Window:
The Id of the Excel file in which you’ve opened or created a sheet.
ID Of Excel Window:
The Id of the Excel file in which you’ve opened or created a sheet.
![]() Text Variable:
The destination of the operation. The contents of the cell will be saved here. You can use the % sign to insert the variable that you want.
Text Variable:
The destination of the operation. The contents of the cell will be saved here. You can use the % sign to insert the variable that you want.
![]() Cell:
The source of the operation. The default value of this parameter is the “Focused Cell”.
Cell:
The source of the operation. The default value of this parameter is the “Focused Cell”.
![]() Get a range from focused cell to:
By selecting this option, you can retrieve the contents of a range of cells. This operation begins from the focused cell and moves in the direction that you specify. The endpoint of this operation can be the leftmost cell or the rightmost cell.
Get a range from focused cell to:
By selecting this option, you can retrieve the contents of a range of cells. This operation begins from the focused cell and moves in the direction that you specify. The endpoint of this operation can be the leftmost cell or the rightmost cell.
Set Cell Text
When you want to change the contents of an Excel Cell, you can use this action.
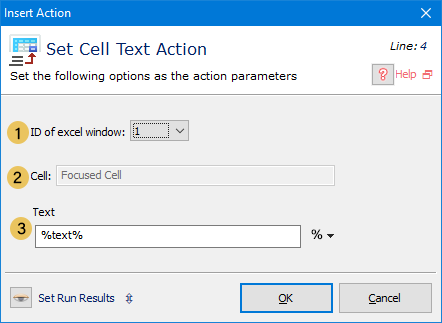
Description of the parameters:
![]() ID Of Excel Window:
The Id of the Excel file in which you’ve opened or created a sheet.
ID Of Excel Window:
The Id of the Excel file in which you’ve opened or created a sheet.
![]() Cell:
The destination of the operation. The default value of this parameter is the “Focused Cell”.
Cell:
The destination of the operation. The default value of this parameter is the “Focused Cell”.
![]() Text Variable:
The source of the operation. The contents of this variable will be set to cell. You can use the % sign to insert the variable that you want.
Text Variable:
The source of the operation. The contents of this variable will be set to cell. You can use the % sign to insert the variable that you want.
Go to Cell
You can use this action to focus on a specific cell in the Excel file.
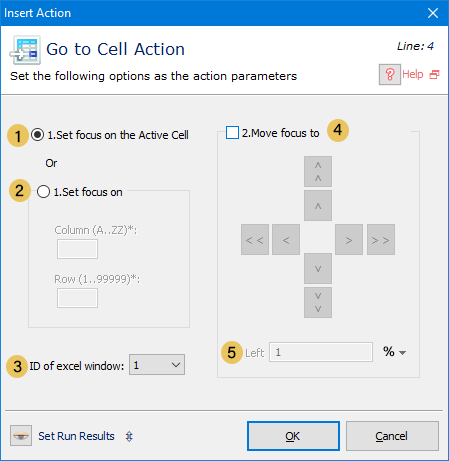
Description of the parameters:
![]() Set Focus On The Active Cell:
Selects the currently activated cell of the opened Excel file.
Set Focus On The Active Cell:
Selects the currently activated cell of the opened Excel file.
![]() Set Focus On:
If you enable this option, you can select the cell using the letters A .. ZZ which specify the columns and the numbers 1 … 99999 which specify the row.
Set Focus On:
If you enable this option, you can select the cell using the letters A .. ZZ which specify the columns and the numbers 1 … 99999 which specify the row.
![]() ID Of Excel Window:
The Id of the Excel file in which you’ve opened or created a sheet.
ID Of Excel Window:
The Id of the Excel file in which you’ve opened or created a sheet.
![]() Move Focus To:
By selecting this option you can move the active cell to right, left, do
Move Focus To:
By selecting this option you can move the active cell to right, left, do
![]() To specify the amount of the 4th parameter’s movement.
You can insert numbers or use the % sign to insert numeric variables here.
To specify the amount of the 4th parameter’s movement.
You can insert numbers or use the % sign to insert numeric variables here.
Check Cell
You can use this action to check the value of a specific cell in the Excel file.
Description of the parameters:
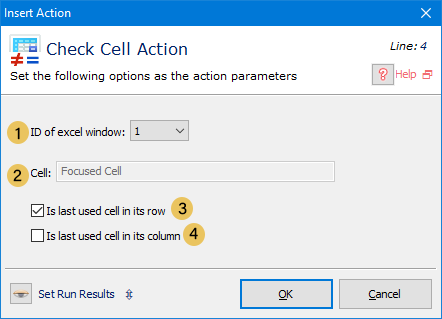
![]() ID Of Excel Window:
The Id of the Excel file in which you’ve opened or created a sheet.
ID Of Excel Window:
The Id of the Excel file in which you’ve opened or created a sheet.
![]() Cell:
The default value of this parameter is the Focused Cell.
Cell:
The default value of this parameter is the Focused Cell.
![]() Is Last Used Cell In Its Row:
Checks if the focused cell is the last cell in the row that has any contents.
Is Last Used Cell In Its Row:
Checks if the focused cell is the last cell in the row that has any contents.
![]() Is Last Used Cell In Its Column:
Checks if the focused cell is the last cell in the column that has any contents
Is Last Used Cell In Its Column:
Checks if the focused cell is the last cell in the column that has any contents
Save or Close Excel File
You can use this action to close or save the Excel File.
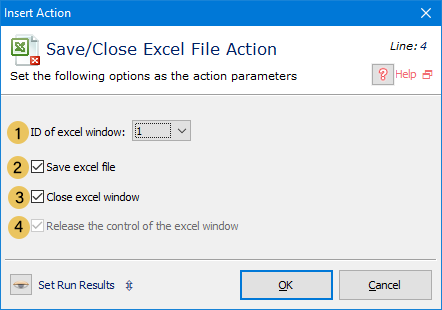
Description of the parameters:
![]() ID Of Excel Window:
The Id of the Excel file which you want to close or save its contents.
ID Of Excel Window:
The Id of the Excel file which you want to close or save its contents.
![]() Save Excel File
Save Excel File
![]() Close Excel Window
Close Excel Window
![]() Release The Control Of The Excel Window:
Releases the handle of the Excel file
Release The Control Of The Excel Window:
Releases the handle of the Excel file
Display Picture
You can use this action to display an image (PNG) while the actions are running.
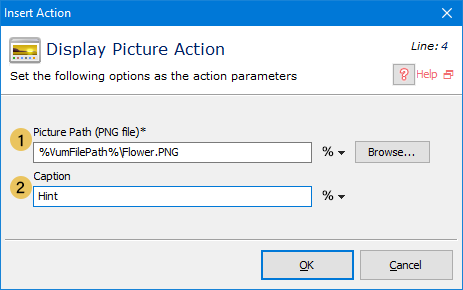
Description of the parameters:
![]() (Picture Path (PNG File:
The full name and address of the PNG file that you want to show. You can use the Browse button to insert the name and path of the PNG file or use the % sign to choose different variables.
(Picture Path (PNG File:
The full name and address of the PNG file that you want to show. You can use the Browse button to insert the name and path of the PNG file or use the % sign to choose different variables.
![]() Caption:
The title of the window that shows the PNG file. You can use the % sign to choose different variables.
Caption:
The title of the window that shows the PNG file. You can use the % sign to choose different variables.
Hide Picture
You can use this action to hide the image (PNG) that’s been opened.
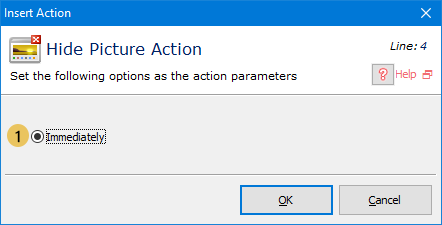
Description of the parameters:
![]() Immediately:
If this option is selected, the PNG file that’s open immediately hides and closes.
Immediately:
If this option is selected, the PNG file that’s open immediately hides and closes.
Message Box
You can use this action to show a message to the user.
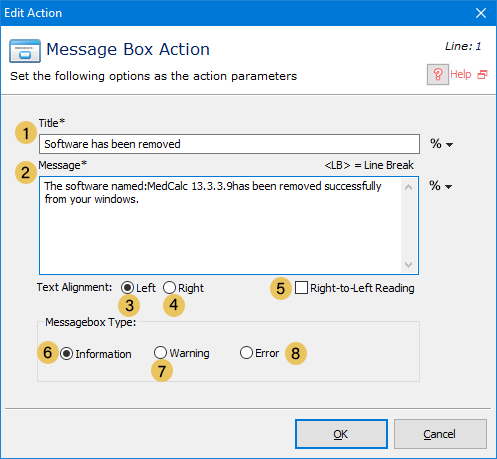
Description of the parameters:
![]() Title:
The title of the message box window. You can use the % sign to choose different variables.
Title:
The title of the message box window. You can use the % sign to choose different variables.
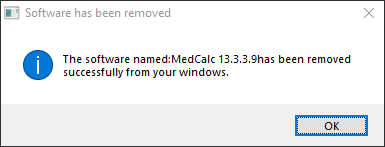
![]() Message:
You can use the % sign to choose different variables. If you use '
Message:
You can use the % sign to choose different variables. If you use '
![]() Text Alignment Left:
If you select this option, the message will be left aligned.
Text Alignment Left:
If you select this option, the message will be left aligned.
![]() Text Alignment Right:
If you select this option, the message will be right aligned
Text Alignment Right:
If you select this option, the message will be right aligned
![]() Right- to- Left Reading:
If you select this option, all the contents of the window will be displayed from right to left.
Right- to- Left Reading:
If you select this option, all the contents of the window will be displayed from right to left.
![]() (MessageBox Type (Information:
To display information to the user.
(MessageBox Type (Information:
To display information to the user.
![]() (MessageBox Type (Warning:
To warn the user about a potentially harmful action.
(MessageBox Type (Warning:
To warn the user about a potentially harmful action.
![]() (MessageBox Type (Error:
To show errors to users.
(MessageBox Type (Error:
To show errors to users.
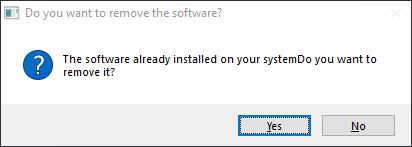
Question Box
If you want to ask a question from the user, you can use this action.

Description of the parameters:
![]() Title:
The title of the question box window. You can the % sign to choose different variables.
Title:
The title of the question box window. You can the % sign to choose different variables.
![]() Question:
You can use the % sign to choose different variables. If you use '
Question:
You can use the % sign to choose different variables. If you use '
![]() Text Alignment Left:
If you select this option, the message will be left aligned.
Text Alignment Left:
If you select this option, the message will be left aligned.
![]() Text Alignment Right:
If you select this option, the message will be right aligned
Text Alignment Right:
If you select this option, the message will be right aligned
![]() Right To Left Reading:
If you select this option, all the contents of the window will be displayed from right to left.
Right To Left Reading:
If you select this option, all the contents of the window will be displayed from right to left.
Input Box
You can use this action if you want to get an input from user. You specify the variable that will be used to save the input.
You can use this input to modify the behavior of the macro based on the specified value. (for example you can ask the user how many times an action should be repeated)
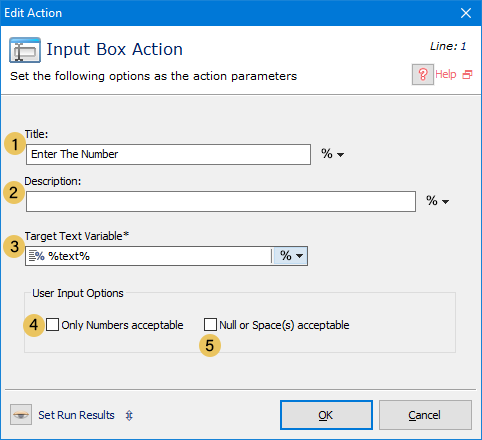
Description of the parameters:
 Title:
The title of the question box window. You can use the % sign to choose different variables.
Title:
The title of the question box window. You can use the % sign to choose different variables.
![]() Description:
You can use the % sign to choose different variables.
Description:
You can use the % sign to choose different variables.
![]() Target Text Value:
The value that the user inputs, will be saved to this variable. You can use the % sign to choose different variables.
Target Text Value:
The value that the user inputs, will be saved to this variable. You can use the % sign to choose different variables.
![]() Only Numbers Acceptable:
If you select this option, the user will only be able to insert numbers in the field.
Only Numbers Acceptable:
If you select this option, the user will only be able to insert numbers in the field.
![]() Null Or Space(s) Acceptable:
If you select this option, the user can insert spaces and an empty value will also be accepted.
Null Or Space(s) Acceptable:
If you select this option, the user can insert spaces and an empty value will also be accepted.
Check Windows Version
You can use this action to check the version of the Windows Operating System. If the version of the windows is compatible with the values that you specify, the result will be a success.
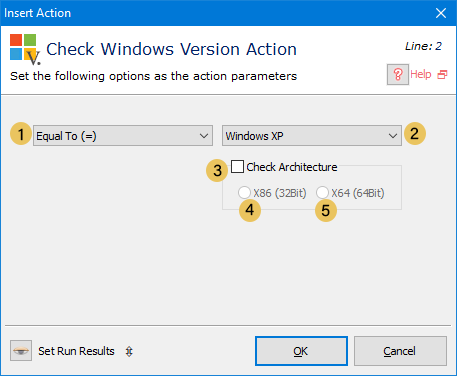
Description of the parameters:
![]() Operator:
Checks the version of the Windows. Can be one of the following:
Operator:
Checks the version of the Windows. Can be one of the following:
- Equal to
- Newer Than
- Older Than
- Equal or Older Than
- Equal or Newer Than
![]() The Version of the Windows
Can be one of the following:
The Version of the Windows
Can be one of the following:
Windows XP / Windows Vista / Windows 7 / Windows 8 / Windows Server 2003 Windows Server 2003 R2 / Windows Server 2008 / Windows Server 2008 R2 Windows Server 2012 / Windows 10
![]() Check Architecture:
The architecture of the windows (32 bit or 64 bit) will be checked.
Check Architecture:
The architecture of the windows (32 bit or 64 bit) will be checked.
![]() (X86 (32bits:
The action succeeds for 32bit versions of the Windows.
(X86 (32bits:
The action succeeds for 32bit versions of the Windows.
![]() (X64 (64bits:
The action succeeds for 64bit versions of the Windows.
(X64 (64bits:
The action succeeds for 64bit versions of the Windows.
Jump
You can use this action to jump from one action (line) to another (line).
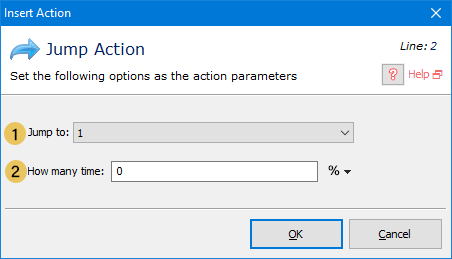
You can use this action to jump from one action (line) to another (line).
![]() Jump to:
The number of the line to jump.
Jump to:
The number of the line to jump.
![]() How Many Times:
If this parameter is set to 0, the jump will happen forever. But if you specify a number, it will jump that many times. You can use the % sign to select the numeric variable that you want.
How Many Times:
If this parameter is set to 0, the jump will happen forever. But if you specify a number, it will jump that many times. You can use the % sign to select the numeric variable that you want.
Comment
This action has no results on the player application. You can use this action as notes or guides in the Editor application.
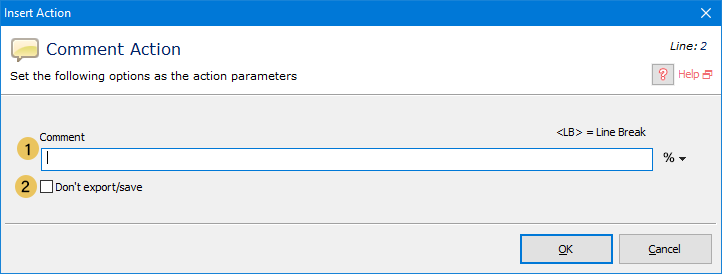
Description of the parameters:
![]() Comment:
The text that you want to output to the window. You can use '
Comment:
The text that you want to output to the window. You can use '
![]() Don’t export/save:
If this option is selected, the text will only be visible as a note in the Macro. If you want to save your notes in a separate file, you need to uncheck this option.
Don’t export/save:
If this option is selected, the text will only be visible as a note in the Macro. If you want to save your notes in a separate file, you need to uncheck this option.
Contents of the Editor Application
The Actions that have been saved in the macro file are displayed in this section. In the following image, you see a sample:
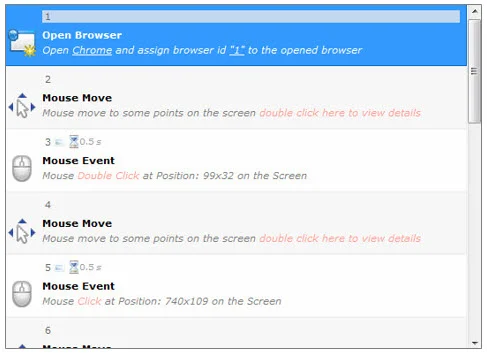
Each type of action has an icon and text in bold that is the type of action and a brief description of the action parameters. If you click on the name and description of the actions, you will be able to edit its parameters (a window will open, and you can edit the parameter that you want)
Saved Images
The Recorder application captures the screen while recording the actions. You can click on each of them and view their original size.
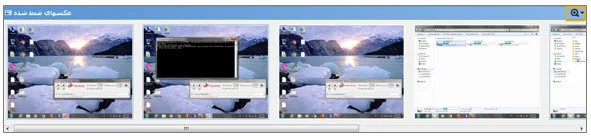
If an action has an image, by clicking on the action, its image will be framed in this section.
Zoom to Target Window
If this option is selected, when you open the recorded images, they will be zoomed to the target window, and only these windows will be displayed in the image frames.
Zoom to Full Screen
If this option is enabled, once you click on the recorded images, they will be displayed without any zoom.
Variables Section
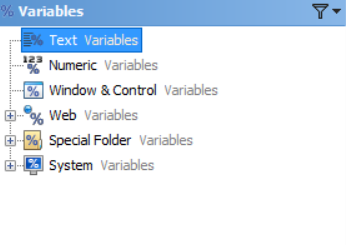
There are five types of variables in the Virtual User Software. These types of variables include:
1. Text variables: to work with text
2. Numeric variables: to work with numbers
3. Window & Control variables: that keep the information about the windows and other parts of the target software(s)
4. Special Folder variables: که به پوشههای خاص و شناخته شده اشاره دارند.
5. Web variables: that will be used to work with webpages.
6. System variables: specific system variables like time.
Variables can change depending on the different situations and rules, and you can use them to create macros that work in different circumstances.
Show or Hide Variable Types
By clicking on the funnel icon on the top right of the variables section, a menu will open, and you can select each variable type to be hidden or visible, depending on your preferences.
Funnel Button
By clicking on the funnel icon on the top right of the variables section, a menu will open, and you can select each variable type to be hidden or visible, depending on your preferences.
Text Variables
If you use the name of a text variable in a parameter when the macro executes, its value will take its place; as you see in the following image, the name of the text variable is “SoftName,” and its value or text is “MedCalc 13.3.3.9”.
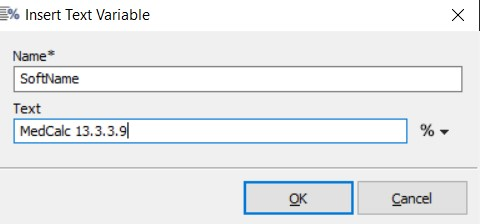
You can use this variable in a parameter that accepts text. As an example, if you use in the Title parameter of the Message Box action, you need to specify the name of the variable, which is “SoftName.” When you play the macro, the value will take its place, and you’ll have the following result in your message box:
![]()
Text variables have lots of use cases. You can, for example, get the title of the window or contents of a text box and save it somewhere else. Or you can save the location of a specific file and then use it to save some other files. To change the name of a text variable, you can double-click on it, or you can right-click on it and select Rename.
Numeric Variables
As the name suggests, a numeric variable is used to work with numbers. For example, you might have
an action that must be performed four times. You can use the Jump action to do this. But if we don’t
know how many times the action must be repeated, we can no longer use the Jump action. Here, we can
use numeric variables and solve this problem. We just need to set the repeat amount in a numeric
variable and use it appropriately.
To change the name of the numeric variable, you can double-click on it, or you can select the
variable, right-click on it and then select Rename.
Window & Control Variables
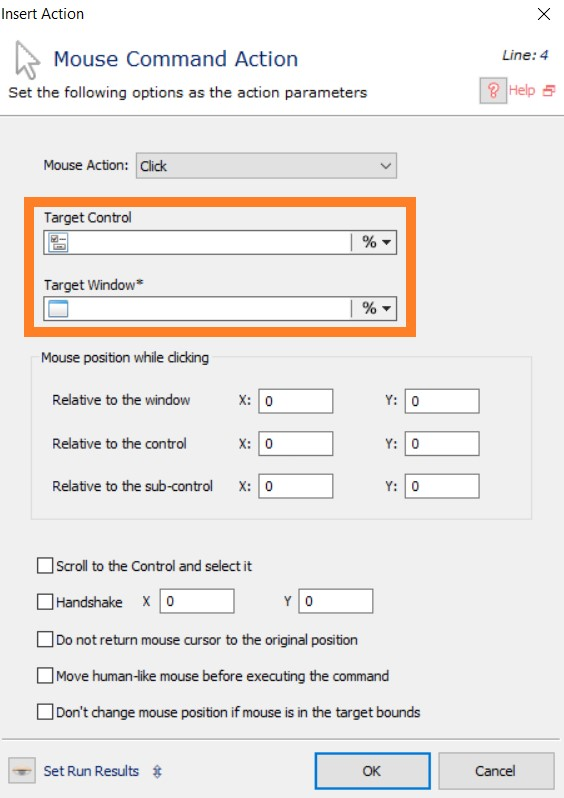
While working with a specific part of an application or software, like performing a mouse command on the OK button of accounting software, first you need to specify the information about that software; this information includes the name, the process (the executable file), window and other application-specific data. This is needed so that the click is performed on the right place. We usually use the Recorder application to retrieve the Window & Control data, but if you want, you can use the insert option to enter this information.
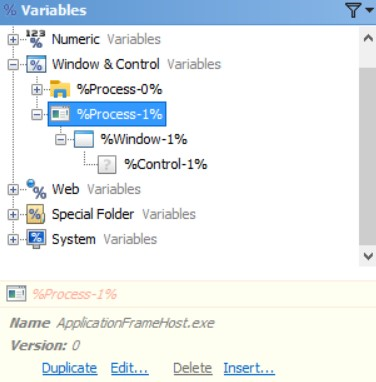
To see the information that has been extracted from the windows and processes and controls, you can right-click on the specific item and select “Edit.” A window will open, and you can see all the details that have been saved. Also, you can right-click on each of the variables and Rename them.
In summary, this information is saved so that the Player can find the right target for the mouse and keyboard actions.
Special Folder Variables
While configuring an action, you might need to specify a Special Folder in windows (like My Music, Program Files, …). If that is the case, you can use these variables. The value of these folders will change depending on the running system. For example, consider the Program Files variable. If your Windows OS is installed on your C drive, the value of this variable will be C:\Program Files, and if it's installed on your D drive, this value will be D:\Program Files.
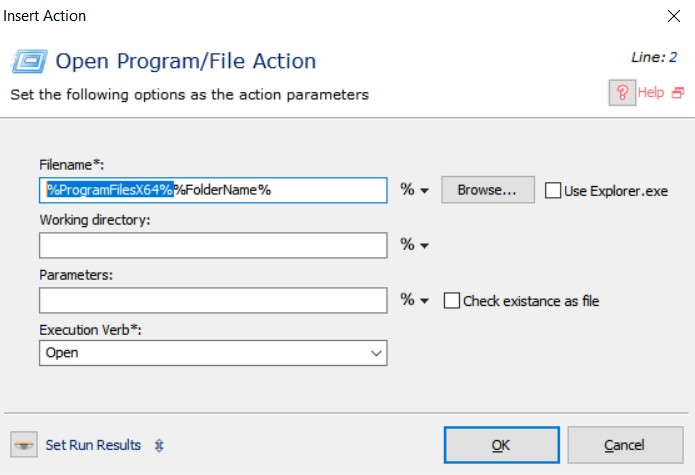
Now, if you use this variable as an action parameter like the image above, depending on the system it's running on, it will change to the correct path of the Program Files folder.
The Special Folder variables have predefined values, and they can only be used in action parameters.
System Variables
Using the system variables, you can retrieve some particular information like the name of the VUM file, the title of the Player application, the system date, system date and time, system time, screen counter, and the scale of the monitor.
1- ![]() :
this variable will have the name of the VUM file as its value.
:
this variable will have the name of the VUM file as its value.
2- ![]() :
the title of the Player application.
:
the title of the Player application.
3- ![]() :
the Date of the system.
:
the Date of the system.
4- ![]() :
the Date & Time of the system.
:
the Date & Time of the system.
5- ![]() :
the Time of the system.
:
the Time of the system.
6- ![]() :
the Time of the system.
:
the Time of the system.
7- ![]() :
the number of monitors.
:
the number of monitors.
8- ![]() :
the scale of the monitor.
:
the scale of the monitor.
Thesevariables will change on different systems and in different circumstances. Like all other variables, you can use these in the parameters of different actions.
Web Variables
If you are working with Web Automation actions, first, you need to save the information on the website, or its elements. Using the Target symbol in the following image, you can drag it and drop in on the web element that you want, and by doing that, that element will be saved on the editor application.
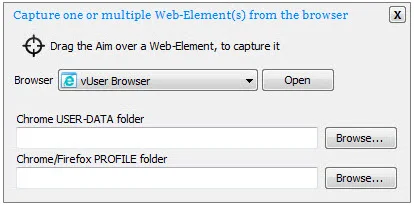
To change the name of the web variables, you can right-click on them and select Rename.
The Editor's Yellow Box
In this box, you can see some of the basic information on the variable that is selected, and you can use the “Insert,” “Duplicate,” “Edit,” & “Delete” tools to modify it.
Insert: by clicking on this button, a window will open, and you can create a new variable.
Delete: If the variable is not used in any of the actions, you can click on this button and delete it.
Edit: by clicking on this option, a window will open, and you can edit different aspects of the variable.
Duplicate: if you click on this option, you can create a copy of the selected variable.
Insert Text Variables
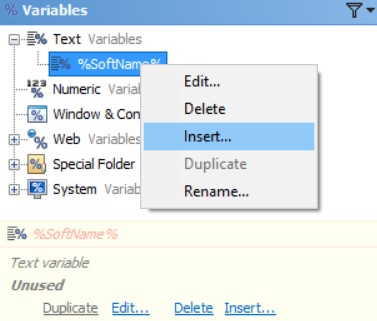
If you right-click on the “Text Variables” in the variables section and click on Insert, or if you click on the insert link at the bottom of the variables section, a window will open, and you can define a new text variable. In the Name field, you should specify the name of the variable, which will be used in the parameters. In the Text field, you should specify the value of the variable. You can use the % button on the right of this field to use other variables here.

Delete Text Variables
If a text variable is not used in any parameters, you can select that variable, right-click on it, and select Delete, or you can click on the Delete link at the bottom of the variables section. Note that there is no way to retrieve the deleted variable, and therefore you need to use this with care. If a text variable is used in one of the actions, these options will be disabled.
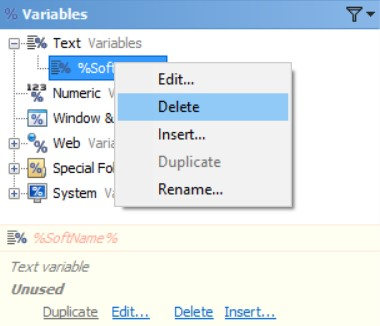
Edit Text Variables
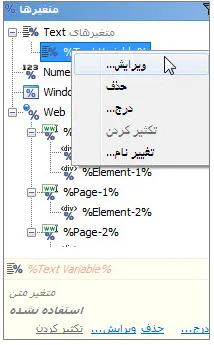
If you select a text variable and click on the Edit link at the bottom of the variables section, or right-click on the selected variable and select Edit, a window will open, and you can change the name or value of the variable.
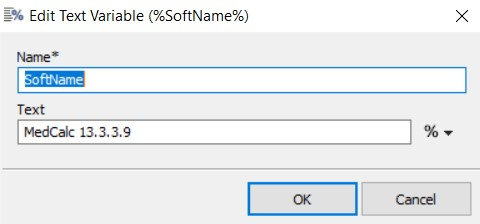
Insert Numeric Variables
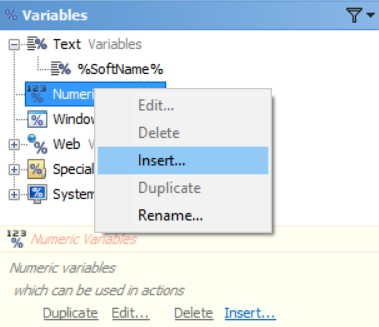
If you right-click on the “Numeric Variables” in the variables section, and click on Insert, or if you select the “Numeric Variables” and click on the insert link at the bottom of the variables section, a window will open, and you can define a new numeric variable. In the Name field, you should specify the name of the variable, which will be used in the parameters. You can insert the value of the variable in the number field or, if you want to use a random value, you can select the “Random number” option and then specify its range.
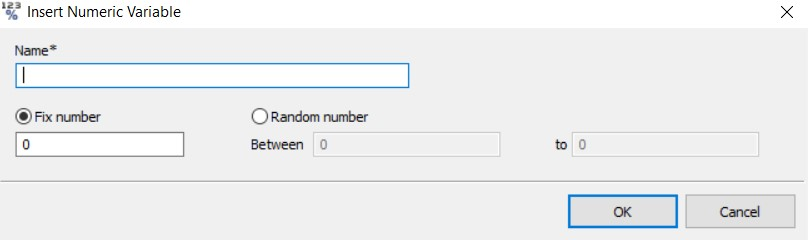
Delete Numeric Variables
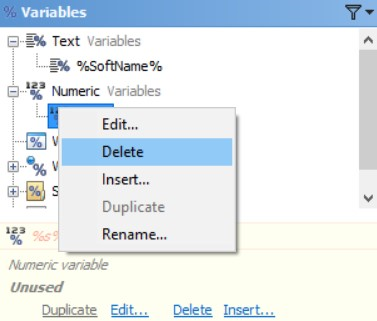
If a numeric variable is not used in any parameters, you can select that variable, right-click on it, and select Delete, or you can click on the Delete link at the bottom of the variables section. Note that there is no way to retrieve the deleted variable, and therefore, you need to use this with care. If a text variable is used in one of the actions, these options will be disabled.
Edit Numeric Variables
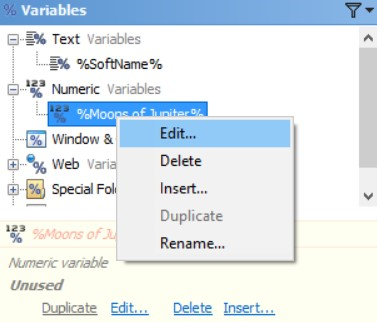
If you select a text variable and click on the Edit link at the bottom of the variables section, or right-click on the selected variable and select Edit, a window will open, and you can change the name or value of the variable.
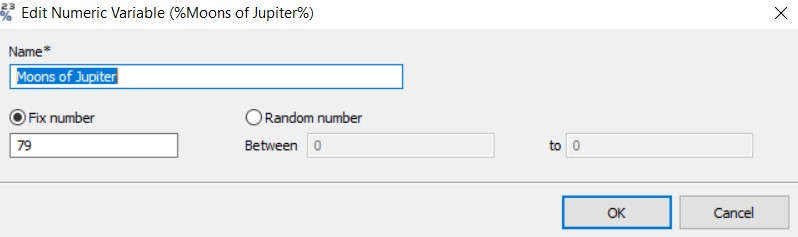
Insert Window & Control Variables
If you right-click on the “Window & Control Variables” in the variables section, and click on Insert, or if you select the “Window & Control Variables” and click on the insert link at the bottom of the variables section, a window will open, and you can define a new Window & Control variable. In order to do that, you should drag the Target symbol to a button or window; by doing that, you will capture all the information of that window or control in a new variable.

Delete Window & Control Variables
If you have selected the last item of the Window & Control variables, you can right-click on it and choose Delete, or you can click on the Delete link at the bottom of the variables section. If an action is related to the variable that you’ve deleted, it will not be correctly executed.
Edit Window & Control Variables

If you select a Window & Control variable and click on the Edit link at the bottom of the variables section, or if you right-click on the selected variable and select Edit, a window will open that is going to look different based on the type of the variable:
1. Edit Window for the Processes: If you select a process and then click on Edit, the following window is going to open:

In this window, you can edit the name of the executable (which is the name of the process), its extension and version, and if you want, you can check the version of the file. If you select the Check Exe Version, the macro will stop if there is a difference.
In rare cases where the name of the executable and the name of the process are different, you can do this: the player application looks for the specified name in the list of open processes. Since the process name and the application name are almost always the same, specifying the name in the edit window is going to work most of the time. Now for the rare cases that these two names are different, or the Player selects different processes in each execution, you just need to change the “Exe Name” parameter to * or ?. This way, the Player will assume that the application is open, and will no longer look for it in the list of processes. You also use the * symbol for the extension of the application.
2. Edit Window for windows: If you select a window and then click on Edit, the following window will open:
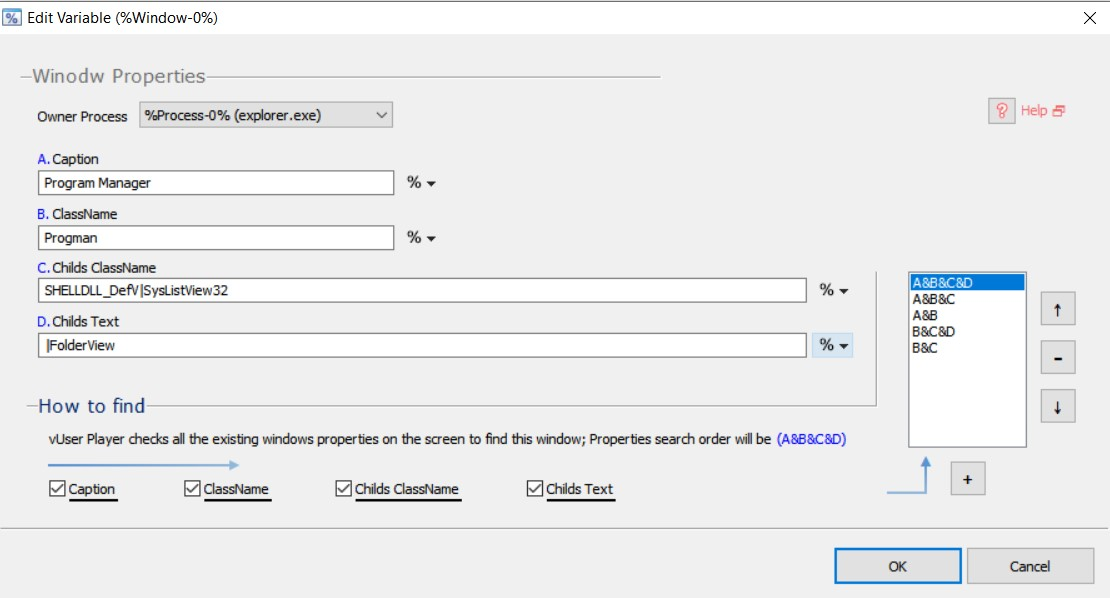
This window has two parts. The first one displays “Window Properties.” In the first field of this part, you can select a different process. In the second part, you can tell the application “How to Find” the window that you want.
There are some key properties that you can specify, and then, using the letters that are associated with each of them (A, B, C, .. ) you can search with a combination of these properties.
3. Edit Window for the controls: If you select a control and then click on Edit, the following window will open
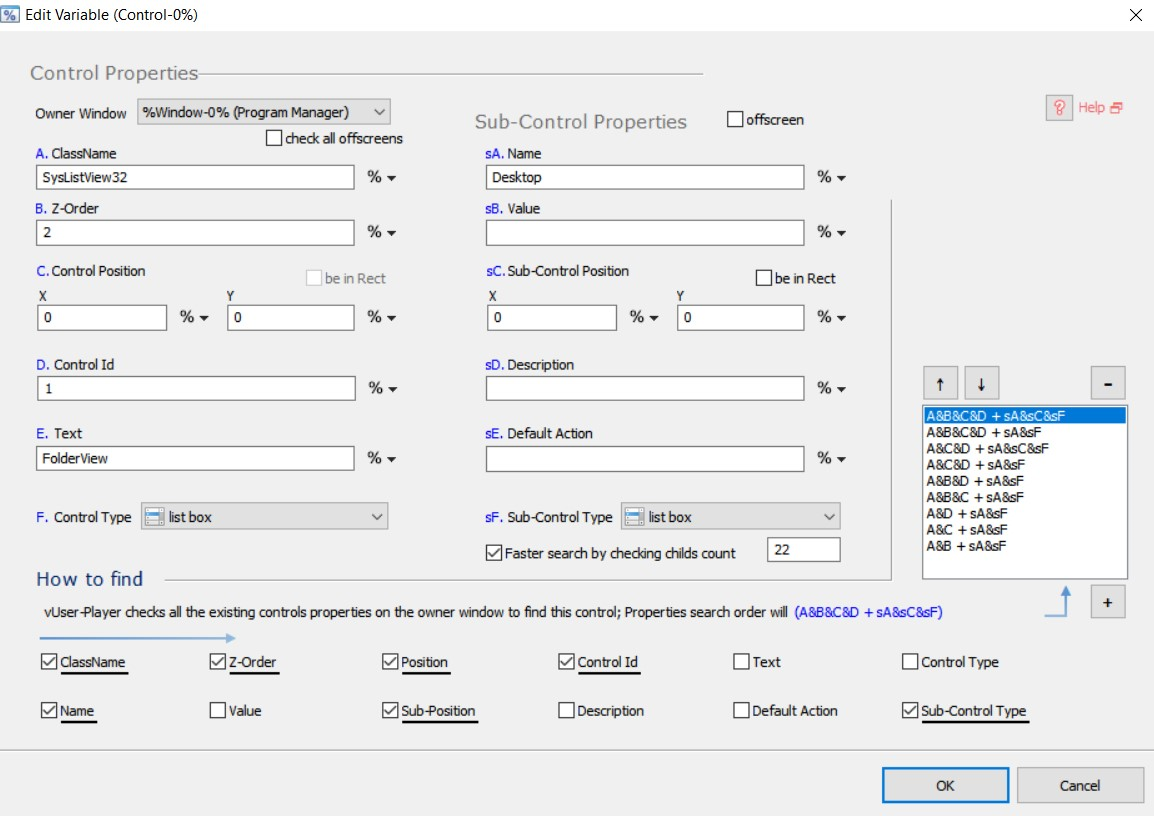
Like the Edit window for Windows, this window has two parts. In the first one, you can specify the parent window of the control, and in the second one, you can use a combination of different properties to find the specific control that you’re looking for.
Context Menu Insert
If you right-click on the “Web Variables” in the variables section, and click on Insert, or if you select the “Web Variables” and click on the insert link at the bottom of the variables section, a window will open, and you can use it to define a new web variable. In order to do that, you need to drag the target symbol in that window and drop it on the element that you want.
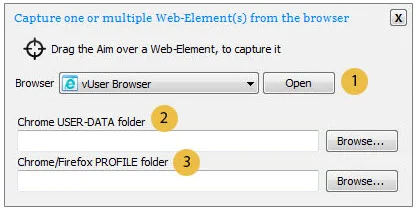
Description of the parameters:
![]() Browser: In order to select the elements of a web page, you need to open that page in a browser. By default, this option is set to the vUser Browser. You can change it to any of the following browsers if you want:
Browser: In order to select the elements of a web page, you need to open that page in a browser. By default, this option is set to the vUser Browser. You can change it to any of the following browsers if you want:
vUser Browser / Internet Explorer / Firefox (32 bit – x86) / Firefox (64 bit – x64) / Chrome
![]() Chrome USER-DATA folder:
Each Browser has cache memory and uses it to save usernames, passwords, and other specific information. Since the Virtual User Software opens the browsers without cache memory (if you’re using the chrome browser), you can specify the user data folder in this parameter, so that you’ll have access to the saved information. You can also use the Browse button to locate the folder.
Chrome USER-DATA folder:
Each Browser has cache memory and uses it to save usernames, passwords, and other specific information. Since the Virtual User Software opens the browsers without cache memory (if you’re using the chrome browser), you can specify the user data folder in this parameter, so that you’ll have access to the saved information. You can also use the Browse button to locate the folder.
![]() Chrome / Firefox PROFILE folder:
Each browser has cache memory and uses it to save usernames, passwords, and other specific information. Since the Virtual User Software opens the browsers without cache memory, (if you’re using the Chrome or Firefox browsers), you can specify the user data folder in this parameter so that you’ll have access to the saved information. You can also use the Browse button to locate
the folder.
Chrome / Firefox PROFILE folder:
Each browser has cache memory and uses it to save usernames, passwords, and other specific information. Since the Virtual User Software opens the browsers without cache memory, (if you’re using the Chrome or Firefox browsers), you can specify the user data folder in this parameter so that you’ll have access to the saved information. You can also use the Browse button to locate
the folder.
Context Menu Delete
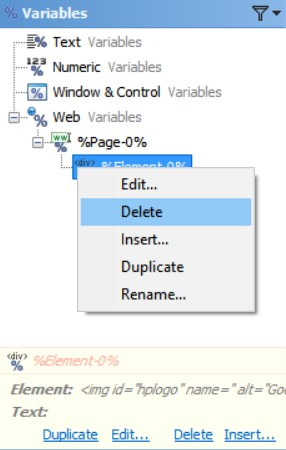
If a web variable (an element or a page) is not used in any parameters, you can select that variable, right-click on it, and select Delete, or you can click on the Delete link at the bottom of the variables section. Note that there is no way to retrieve the deleted variable, and therefore, you need to use this with care. If a text variable is used in one of the actions, these options will be disabled.
Context Menu Edit
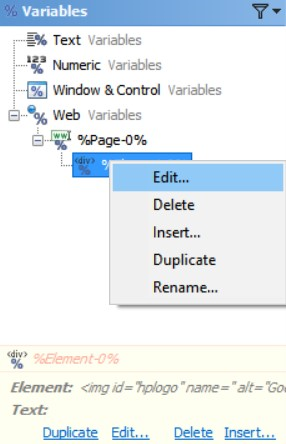
If you select a web variable and click on the Edit link at the bottom of the variables section, or right-click on the selected variable and select Edit, a window will open, and you can change the name or value of the variable. The Edit windows will look different based on the type of the variable that’s being edited.
1. Edit Window for Pages:
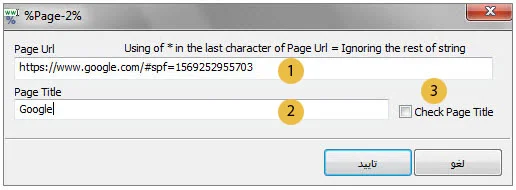
Parameters:
![]() Page Url:
The link of the page. The * symbol means that ignore the characters that come after the * position
Page Url:
The link of the page. The * symbol means that ignore the characters that come after the * position
![]() Page Title:
The title of the web page.
Page Title:
The title of the web page.
![]() Check Page Title:
If this option is selected, the title will be checked.
Check Page Title:
If this option is selected, the title will be checked.
2. Edit Window for the Elements:
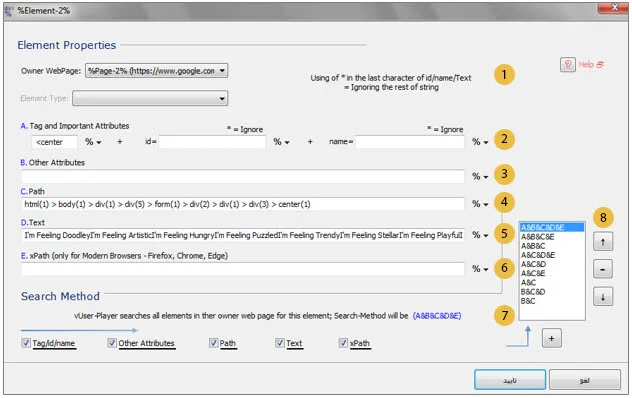
Parameters
![]() Owner Web Page:
The page that we want to capture one of its elements
Owner Web Page:
The page that we want to capture one of its elements
![]() A. Tag and Important Attributes:
The first attribute is the name of the tag. You can also use the percent sign at the right of this field to insert the variable that you want. If you insert an *, the rest of the text will be ignored.
A. Tag and Important Attributes:
The first attribute is the name of the tag. You can also use the percent sign at the right of this field to insert the variable that you want. If you insert an *, the rest of the text will be ignored.
The second attribute is the ID of the tag. Using the ID, you can directly find that tag, and you will no longer need to use its Path or its other attributes. You can also use the percent sign at the right of this field to insert the variable that you want. If you insert an *, the rest of the text will be ignored.
The third parameter is the Name of the tag. You can also use the percent sign at the right of this field to insert the variable that you want. If you insert an *, the rest of the text will be ignored.
![]() B. Other Attributes:
Attributes like class, src, href will be saved in this parameter. You can also use the percent sign at the right of this field to insert the variable that you want. If you insert an *, the rest of the text will be ignored.
B. Other Attributes:
Attributes like class, src, href will be saved in this parameter. You can also use the percent sign at the right of this field to insert the variable that you want. If you insert an *, the rest of the text will be ignored.
![]() C. Path:
The path that should be traversed to reach the tag. You can also use the percent sign at the right of this field to insert the variable that you want. If you insert an *, the rest of the text will be ignored.
C. Path:
The path that should be traversed to reach the tag. You can also use the percent sign at the right of this field to insert the variable that you want. If you insert an *, the rest of the text will be ignored.
![]() D. Text:
The inner text of the tag. You can also use the percent sign at the right of this field to insert the variable that you want. If you insert an *, the rest of the text will be ignored.
D. Text:
The inner text of the tag. You can also use the percent sign at the right of this field to insert the variable that you want. If you insert an *, the rest of the text will be ignored.
![]() E. xPath:
It’s like the path parameter, only here it can be entered with more details. This can only be used in advanced browsers like Edge, Chrome & Firefox. You can also use the percent sign at the right of this field to insert the variable that you want. If you insert an *, the rest of the text will be ignored.
E. xPath:
It’s like the path parameter, only here it can be entered with more details. This can only be used in advanced browsers like Edge, Chrome & Firefox. You can also use the percent sign at the right of this field to insert the variable that you want. If you insert an *, the rest of the text will be ignored.
![]() Search Method:
The Player application will search all the elements of the page to find the one that it’s looking for. This search is performed using the following methods:
Search Method:
The Player application will search all the elements of the page to find the one that it’s looking for. This search is performed using the following methods:
- Tag / ID / Name: the search will be performed based on Tag, or ID or the name of the tag
- Other Attributes: the search will be performed based on other attributes of the tag like class name.
- Path: the search will be performed based on the specified path
- Text: the search will be performed based on the inner text of the tag
- xPath: the search will be performed based on the xPath
![]() 8. In this parameter, you can select the search method, using the character associated with each parameter
8. In this parameter, you can select the search method, using the character associated with each parameter